Aws Lambda to Read Mysql Rds Endpoint
Tapping the power of serverless computing via Lambda functions and cloud-native technologies allows the states to extend the native capabilities that exist in open-source databases. David Yahalom demonstrates how to create a queue using Lambda that tin can be used to add queuing capabilities to MySQL.
Adoption of open up-source database engines, such equally MySQL and PostgreSQL, has become a major commuter shaping the futurity of modern deject-native information architectures. Past combining open-source database technologies, alongside existing commercial database solutions, companies can substantially eat their cake and have information technology too – utilise the more than expensive, commercial database solutions simply for the specific applications that absolutely require it, all while enabling expansion and flexibility of the 'database armada' using lower-cost open source database alternatives. This is the 80/20 dominion of modern data architectures. Notwithstanding the transition isn't always simple.
Near commercial database systems are 'monolithic' and integrate a great deal of avant-garde functionality and capabilities directly into the database itself. As one instance, both Microsoft and Oracle provide an asynchronous messaging/queuing mechanism that is part of the database engine. Oracle calls it Advanced Queueing and Microsoft calls information technology Service Banker. Both are not bad implementations of queueing direct within the database, and many applications have been closely adult around specific database features.
The trouble is that PostgreSQL and MySQL lack some of the congenital-in capabilities you tin can notice in a commercial relational database system forcing customers to either deploy tertiary political party solutions (such as a dedicated queue system, external to the database) or develop custom functionality inside the applications themselves.
But luckily for u.s.a., when it comes to running MySQL and PostgreSQL in the cloud, there are simpler alternatives for mitigating missing functionality in the database itself. For instance, when your run your MySQL databases as an Aurora MySQL cluster in Amazon Web Services, you also have access to the full set of powerful AWS ecosystem services and solutions which you tin leverage where native database functionality is missing.
While Aurora MySQL itself can provide increased performance and high-availability capabilities that go beyond what native MySQL can offer, there are also application-facing advantages. In this article I will provide one such example: using a combination of AWS Elementary Queue Services (SQS) — which are fully managed message queues for microservices and distributed systems plus AWS Lambda — which allows you to run lawmaking without thinking about servers to provide seamless queueing capabilities in the MySQL database itself.
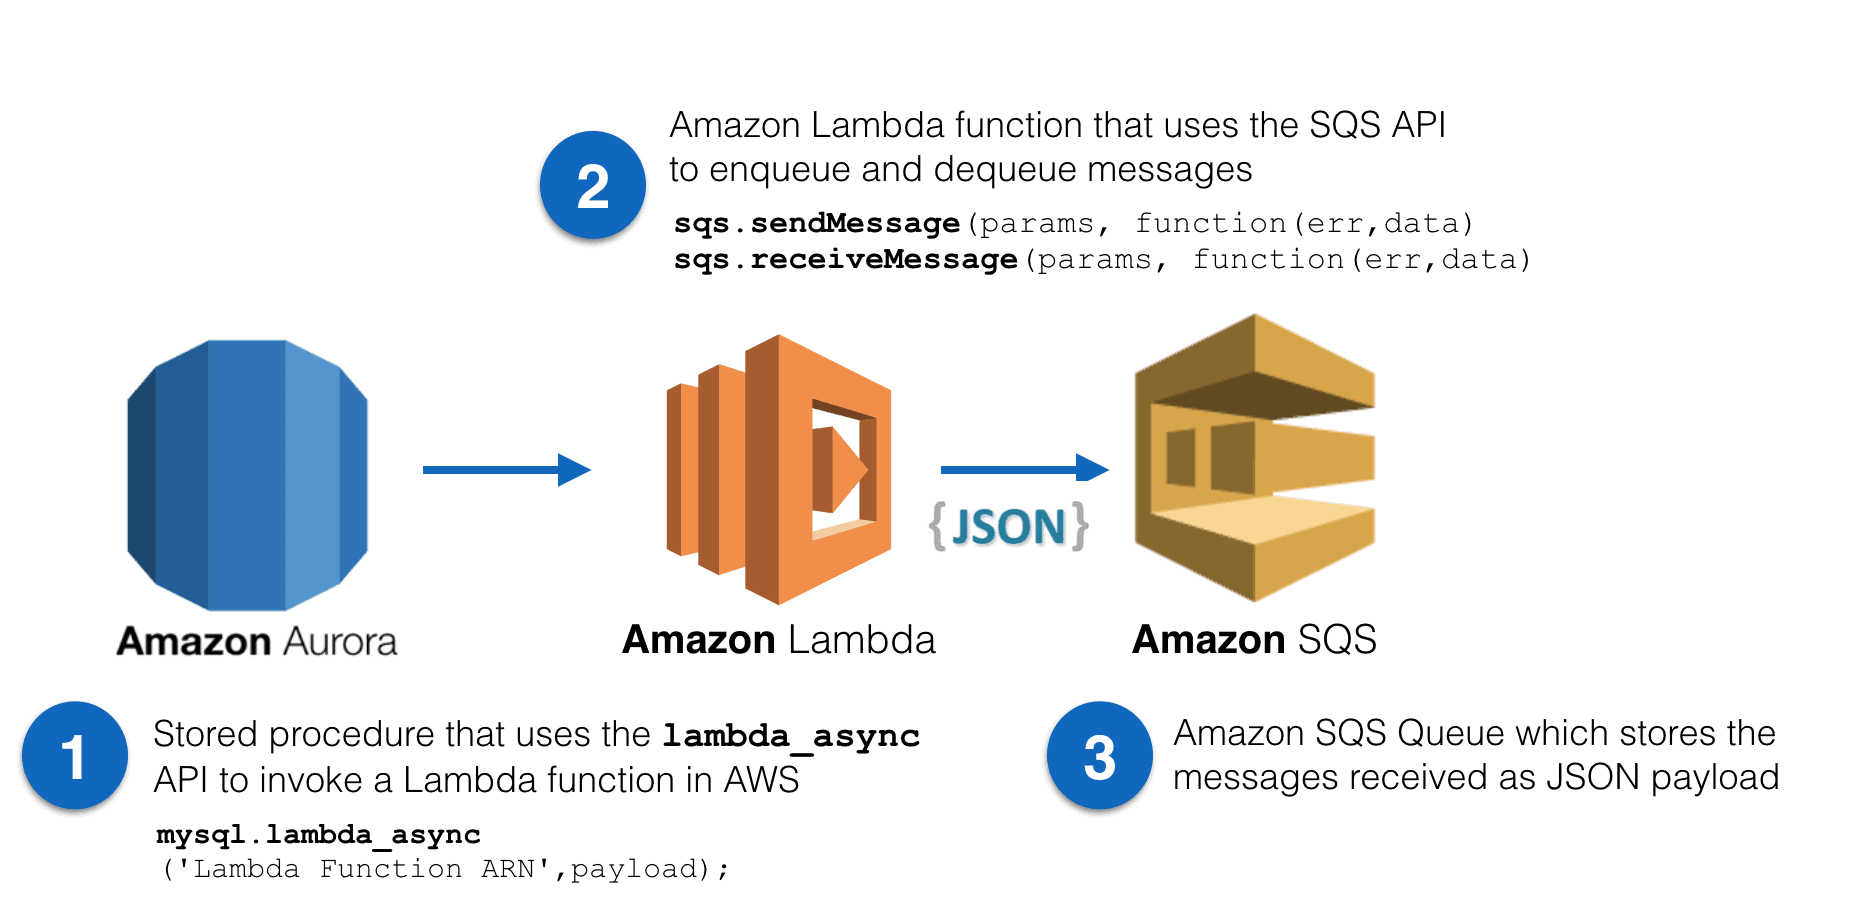
Essentially, you will be performing a iii-step procedure and then that you can enqueue and dequeue letters directly from within an Amazon Aurora MySQL cluster:
-
You will create an Amazon SQS Queue that will exist used to store messages as JSON payloads.
-
You will create a Lambda Function which will use the SQS API to send and receive messages from Amazon SQS.
-
You volition invoke the Amazon Lambda Role from within an Aurora MySQL Cluster using mysql.lambda_async .
![]()
Time to get started!
Create an SQS Queue
The first step is to create the Amazon SQS queue which will store the messages or events. From within the AWS web console –
-
Navigate to Services and type SQS. Select Simple Queue Service.
![]()
-
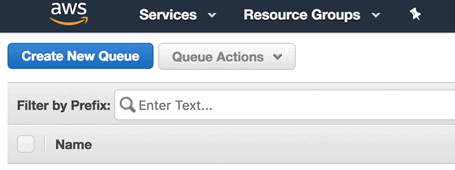
From the next page, click on Create New Queue. If this is your start Amazon SQS queue, you may need to click on the Become Started Now push button instead.
![]()
-
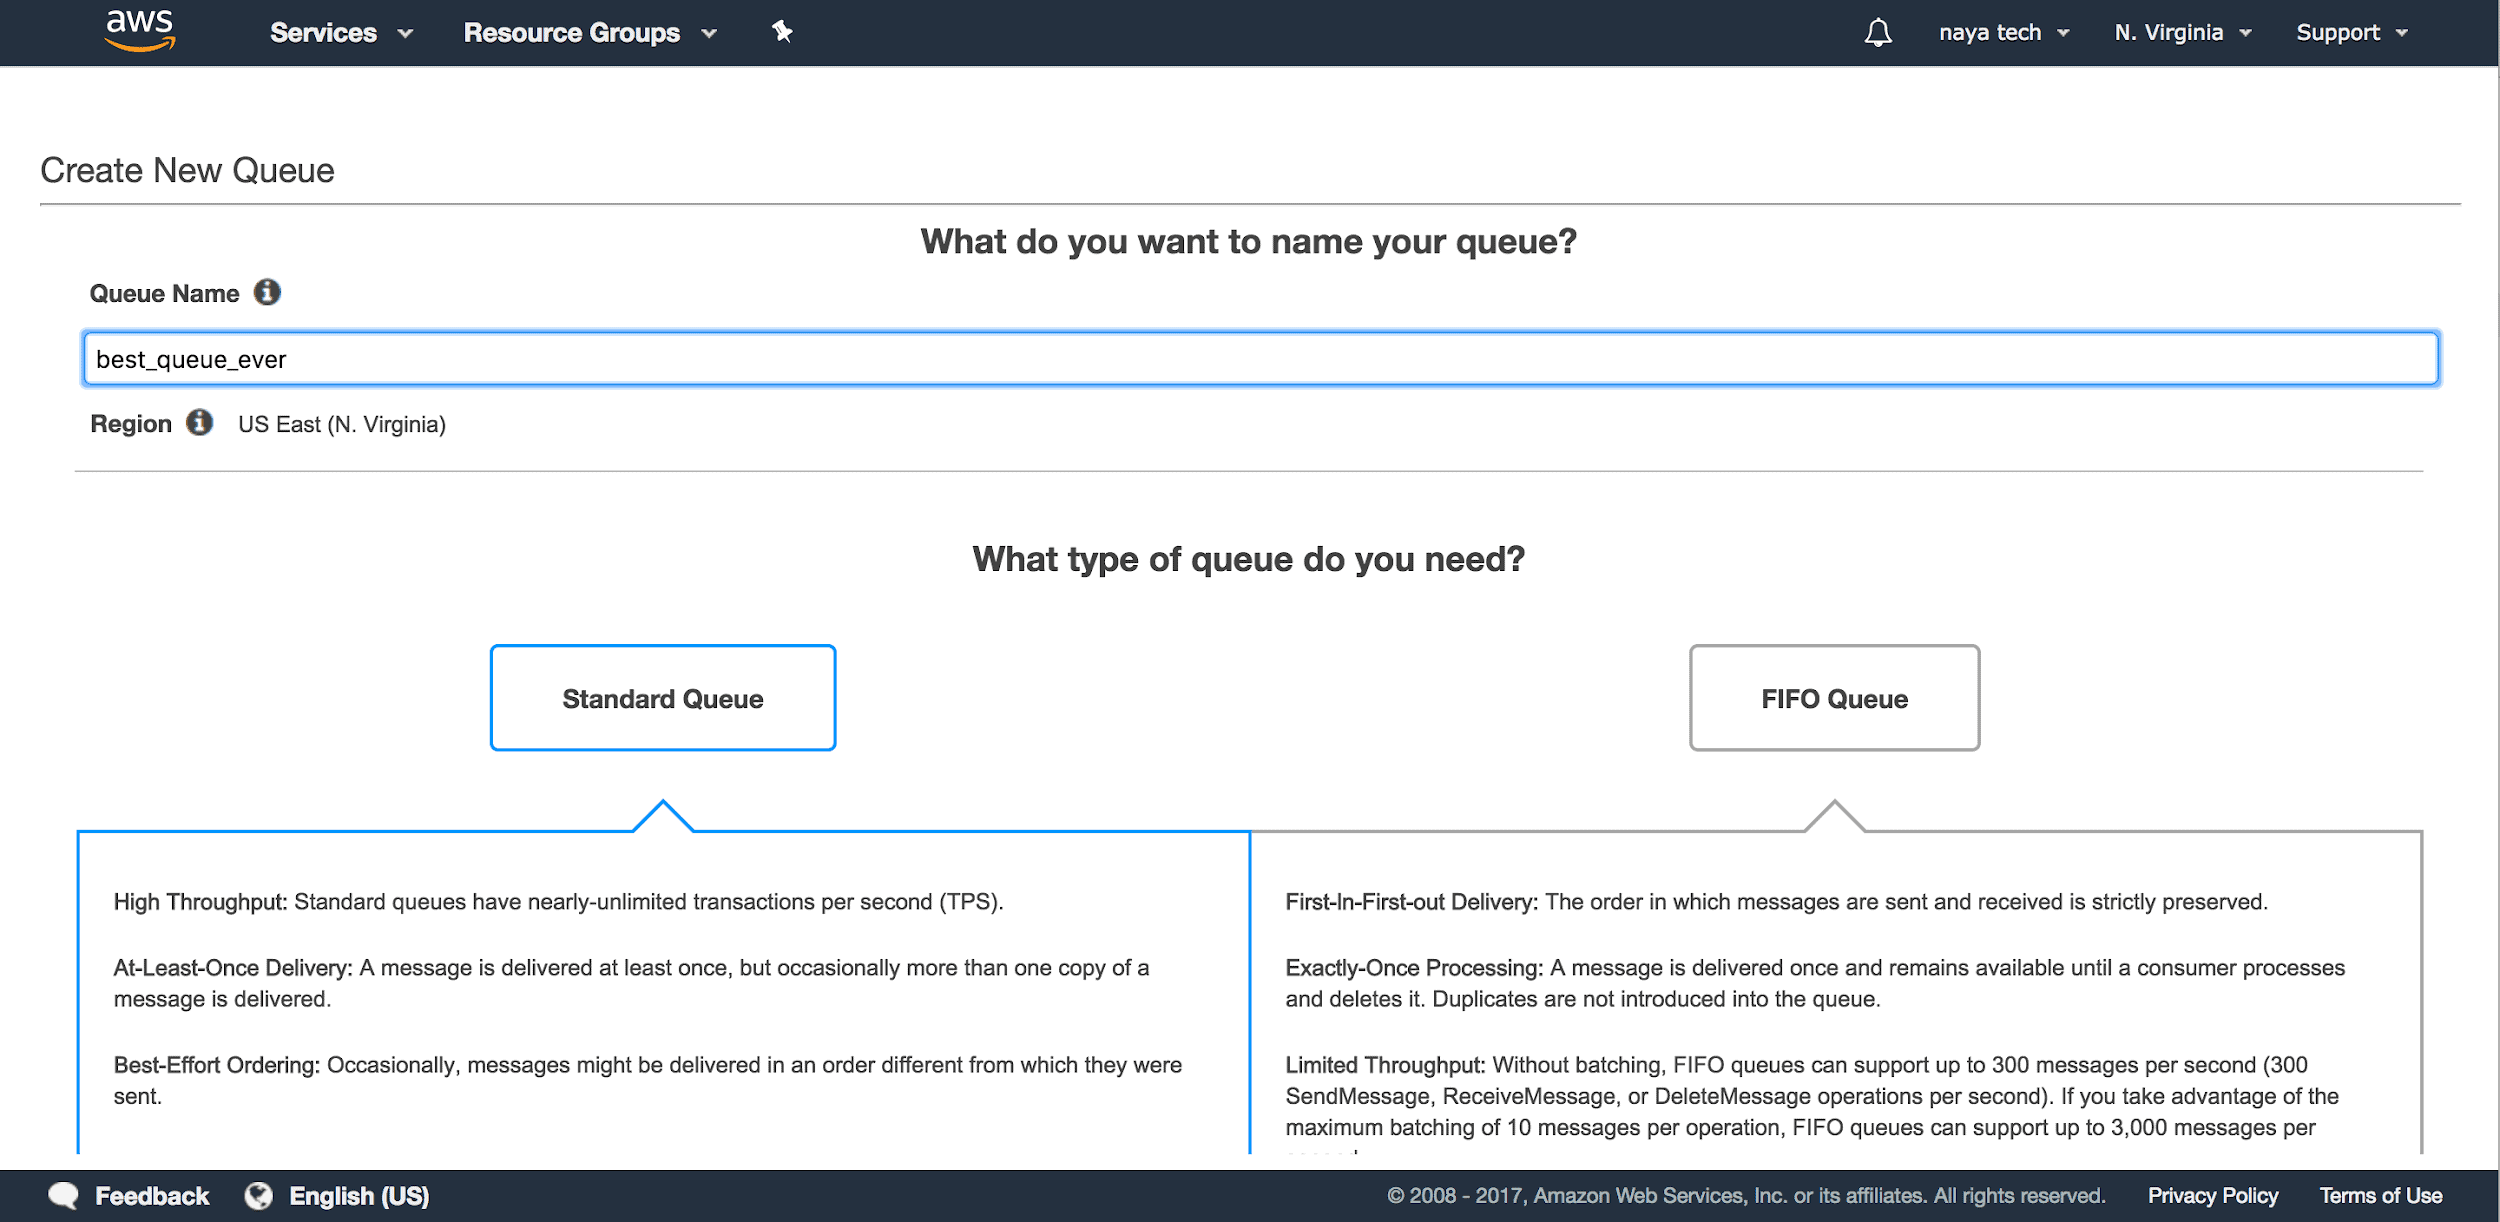
Next, you will have to proper noun your queue. In this instance, I'll aptly proper name my queue best_queue_ever. You will also need to choose the blazon of queue yous wish to create.
You have two options for queue blazon: Standard Queue and FIFO Queue. If you prioritize queue performance over atomicity of queue payload operations, cull a Standard Queue blazon. If you need strict atomicity of operations on your queue with reduced full throughout, choose a FIFO Queue blazon. For this example, select a Standard Queue type.
![]()
-
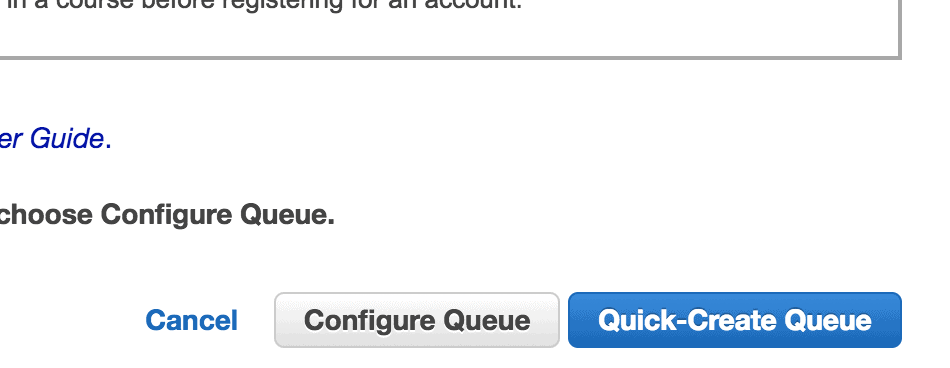
Next, click on Quick Create Queue to create your SQS Queue. For this simple case, you don't have to specify whatever boosted advanced configuration options.
![]()
-
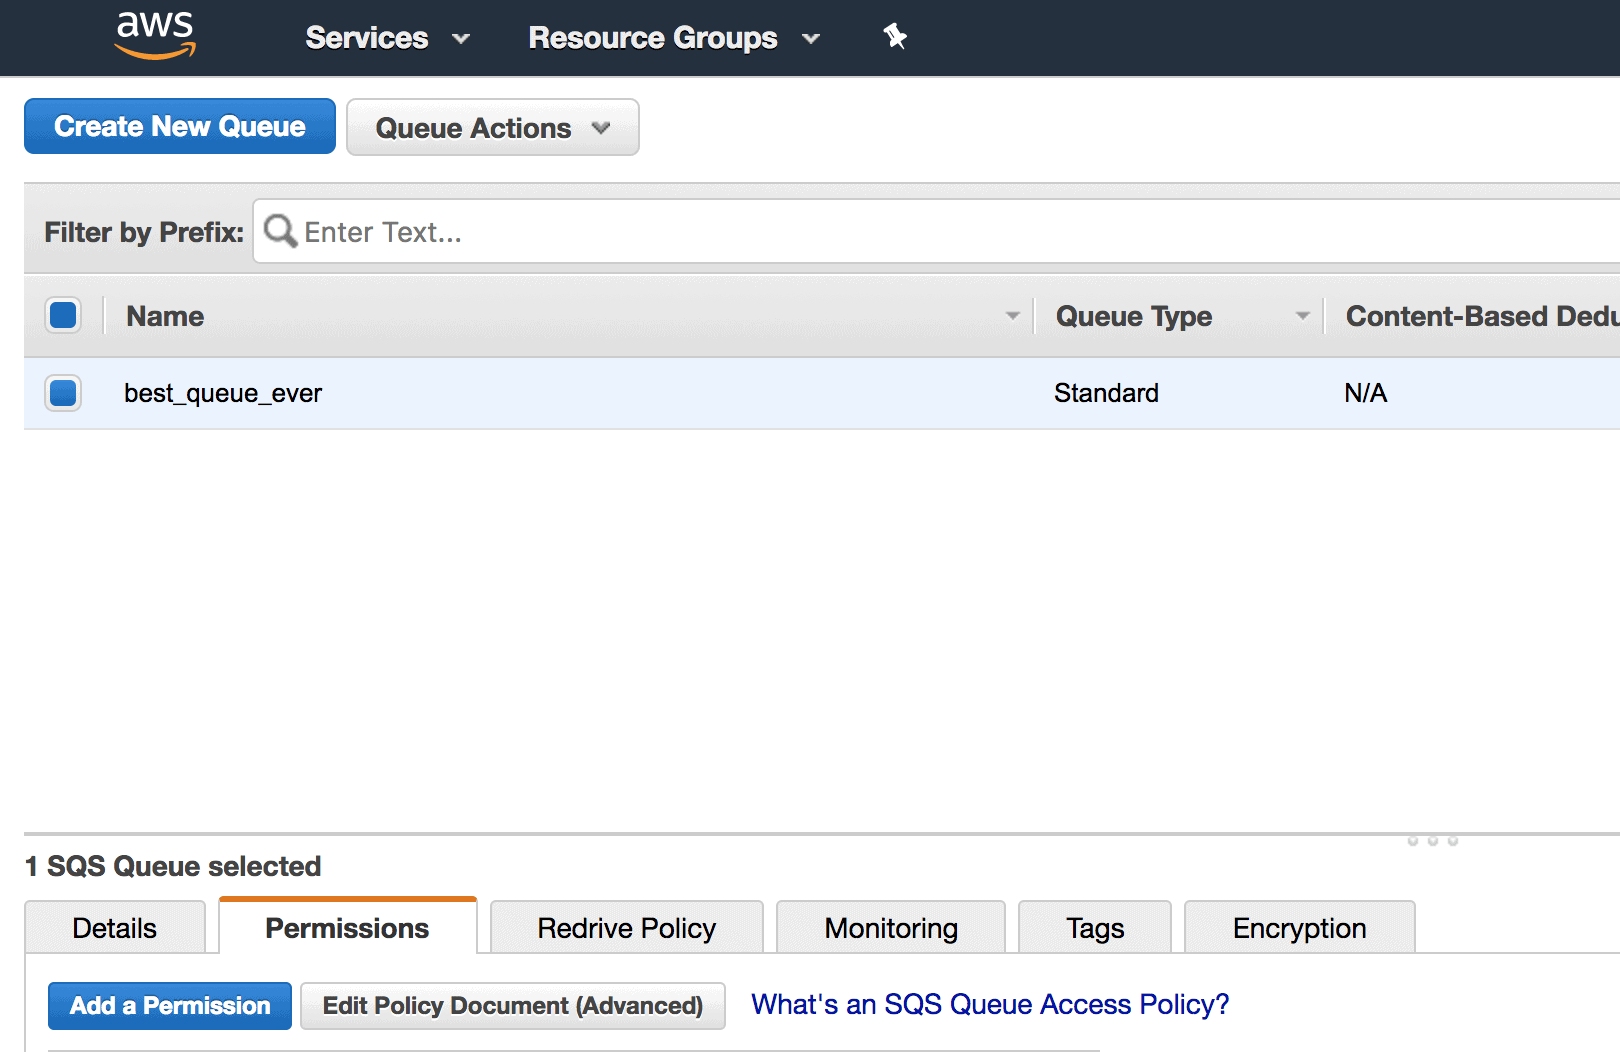
At this point, your SQS Queue has been created and should appear in the SQS Service main page. You will demand to remember the Queue URL so that you can use it inside your Amazon Lambda function. Select the queue and re-create & paste the queue URL to a text editor.
![]()
The queue URL will be in the post-obit format:
https : / / xxxxxxxx / xxxxxxxx / best_queue_ever
-
You volition also need to assign permissions on who can read or write to the new SQS queue. With the queue still selected, navigate to the Permissions tab and click on the Add together a Permission push.
![]()
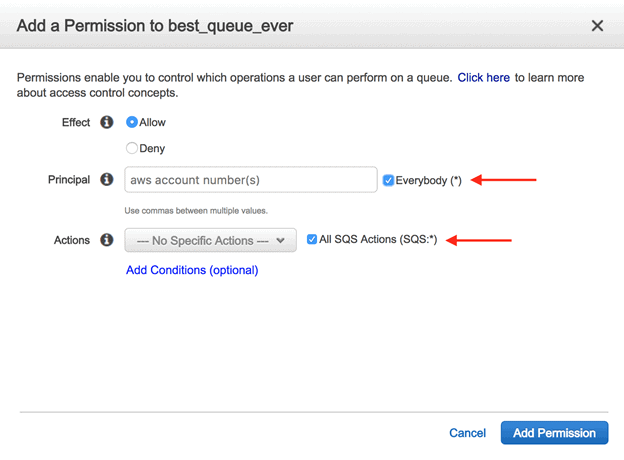
On the next page, you can add permissions for the newly created queue. Select the Everybody checkbox under Principal and All SQS Actions under Deportment. Note that this gives everybody permissions to do annihilation with this queue which is swell for keeping the demo unproblematic and straightforward, but in a real product surroundings, y'all should probably be more granular with permissions on your SQS queues.
![]()
-
As a last step for queue creation, click on the Add Permission button to apply the new permissions on your SQS queue.


Create the Lambda Function
With the SQS Queue configured, now it's fourth dimension to create two Amazon Lambda Functions which volition be used to enqueue and dequeue messages from the SQS queue. Yous will later on see how to become your Aurora MySQL cluster to invoke the Lambda functions and collaborate with the queue.
-
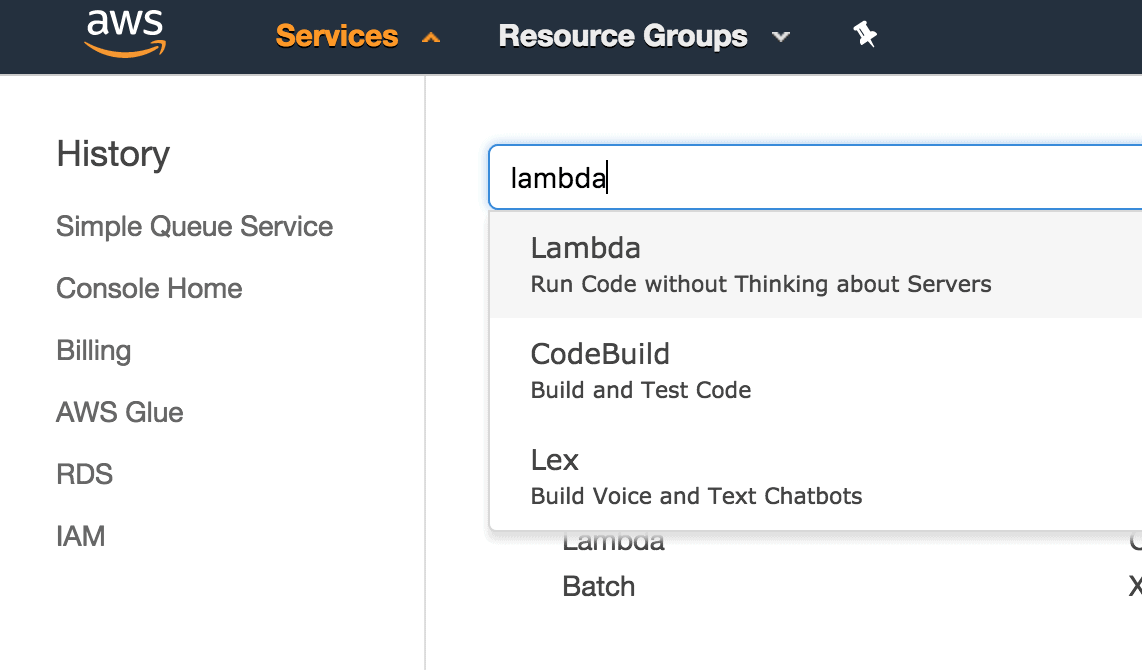
To create the Lambda functions, navigate to Services and type lambda. Then select Lambda.
![]()
-
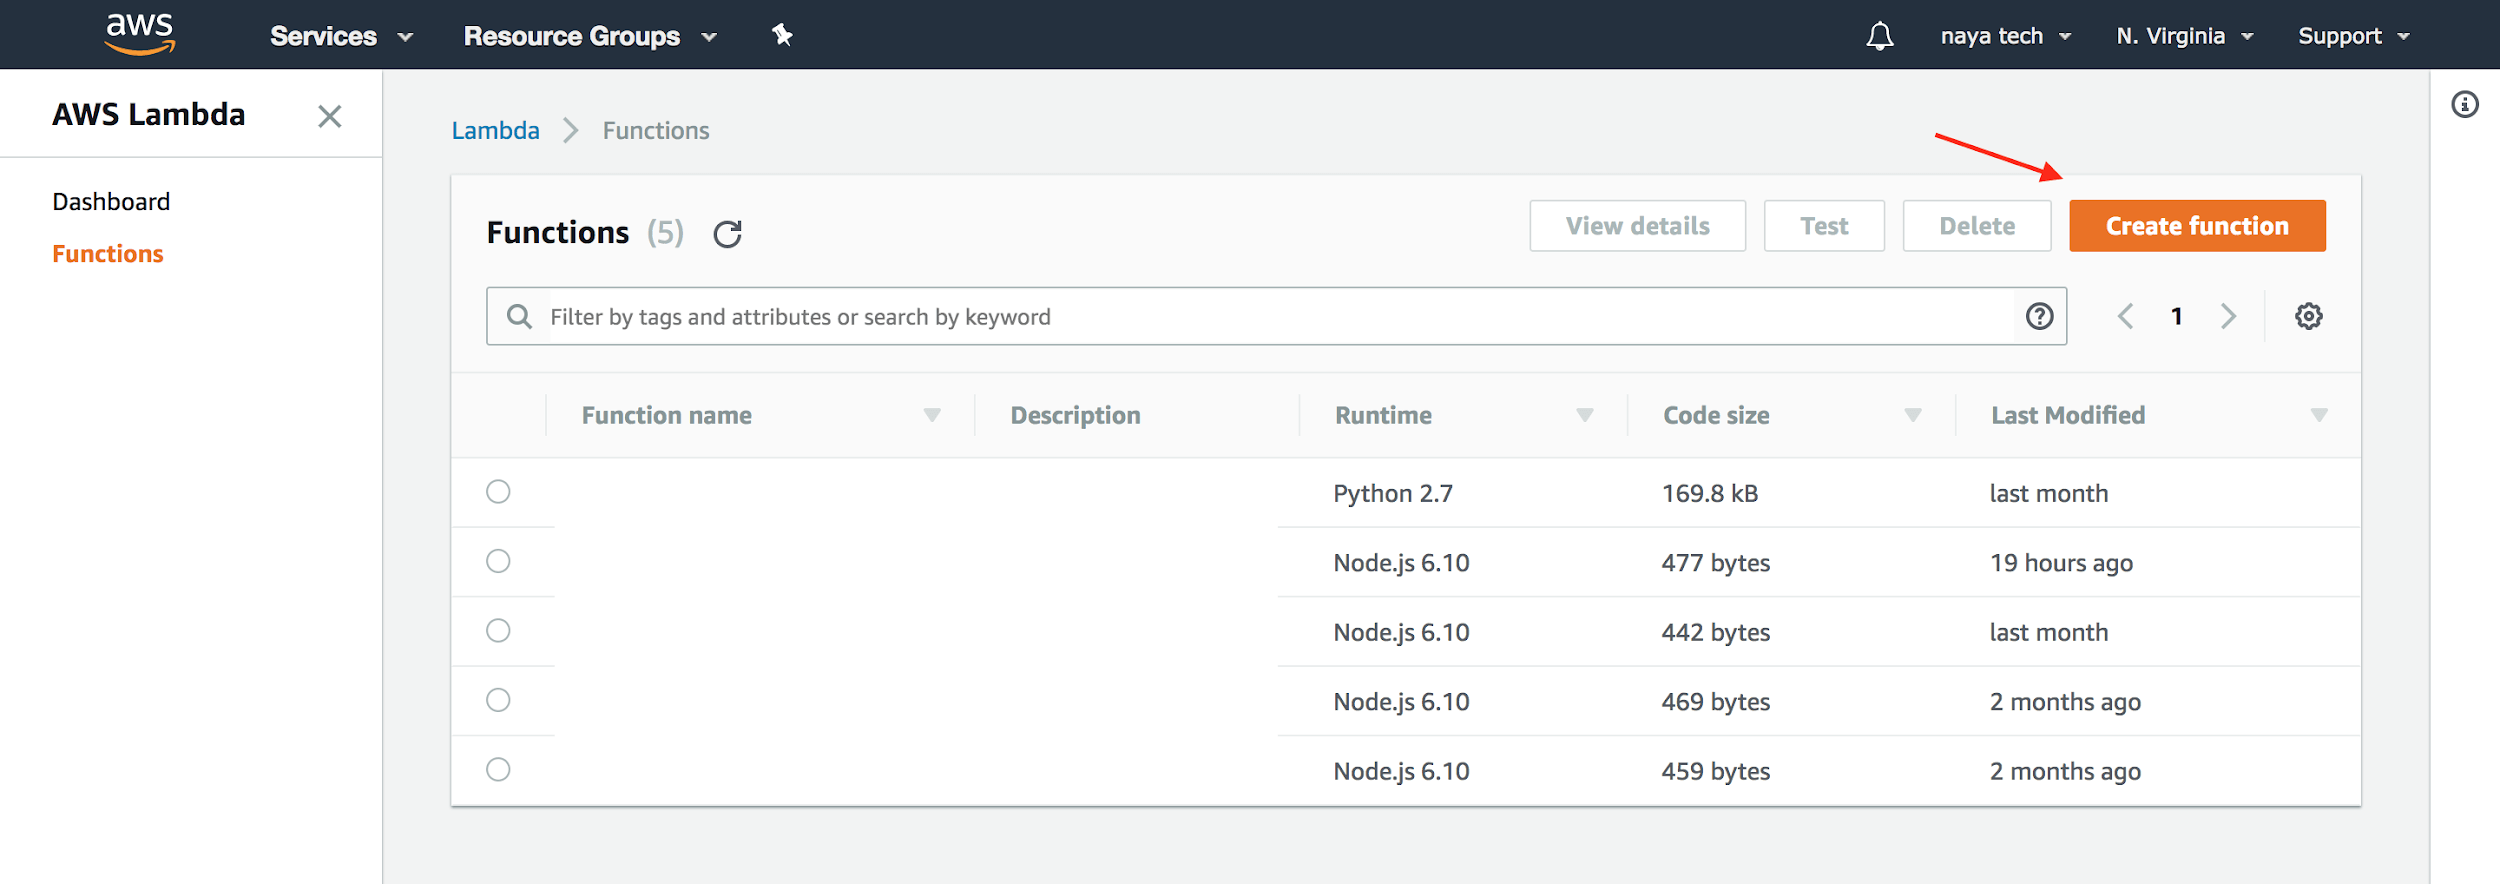
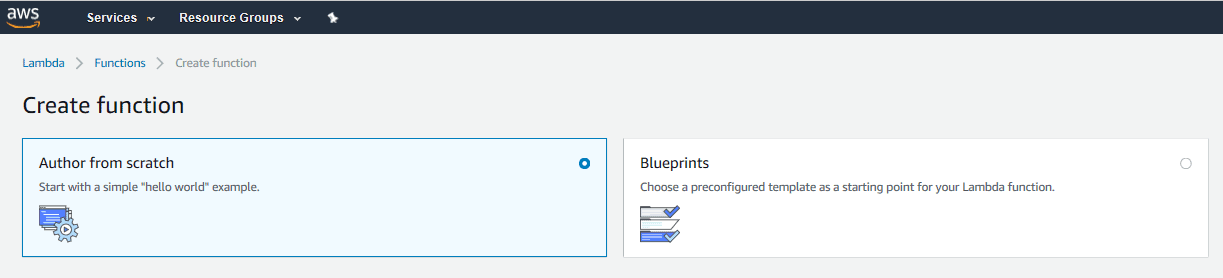
In the Lambda Functions screen, click Create Function to create the outset Lambda function. This i will exist used to enqueue messages, i.eastward., send messages, to the SQS Queue.
![]()
-
Choose Author from scratch, as you do not need to use a blueprint for this particular Lambda function.
![]()
-
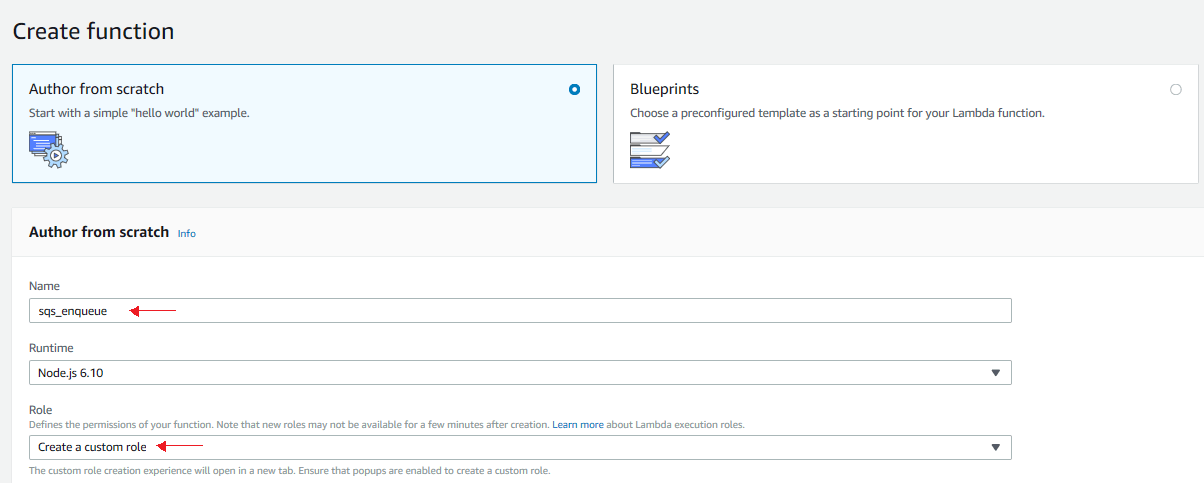
Enter the Lambda role name, I used sqs_enqueue but feel gratis to exist as creative as you lot'd like equally long as you stick with letters, numbers, hyphens, or underscores.
![]()
-
Select Create a custom role under the Part dropdown list. This will open up the IAM Management Console in a new tab in your browser. When you create a Lambda office, you must assign permissions on which resource inside your AWS Business relationship the Lambda function tin admission. Lambda Functions employ an IAM function that grants your lawmaking permissions to access the AWS resources information technology needs.
-
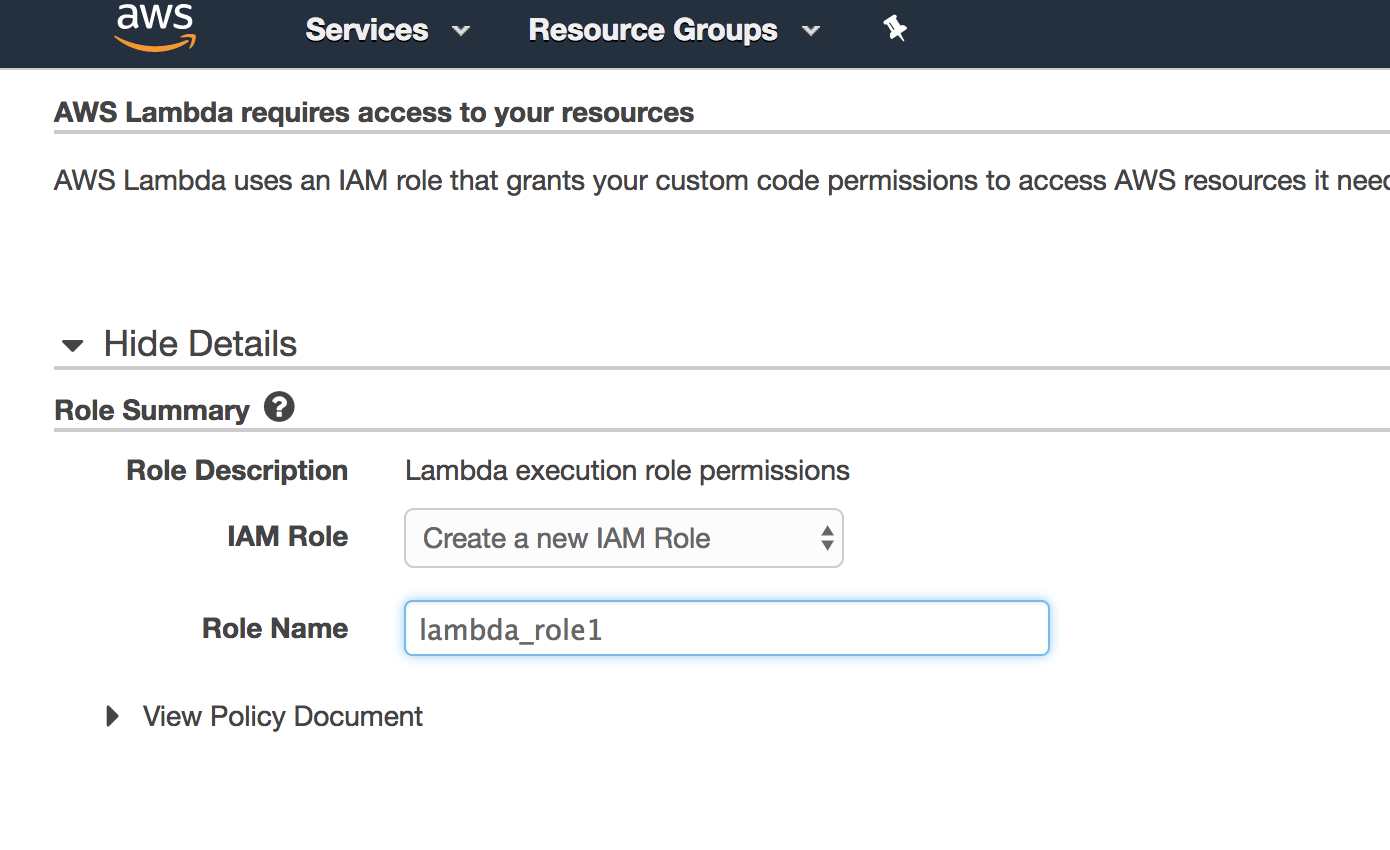
In the new IAM Direction Panel folio, select Create a new IAM Part and specify the part name, such as lambda_role1.
![]()
-
Click on Let at the bottom right of the screen one time finished to create your new IAM Role.
-
Back to the Lambda Role Writer from Scratch page, click the Create Function push button so that y'all can write the Lambda Function code which volition ship letters to the SQS Queue.
-
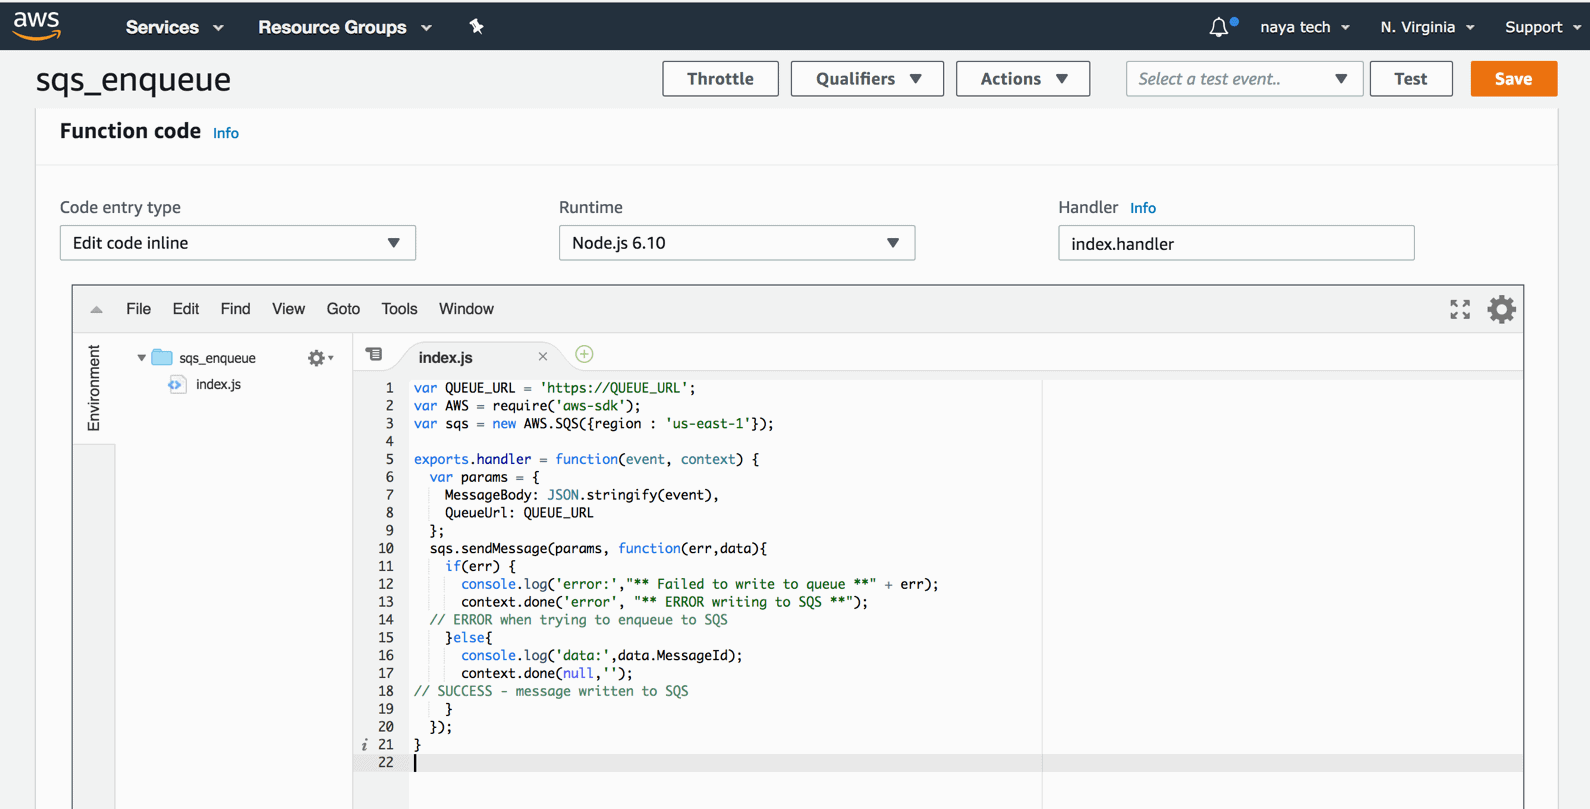
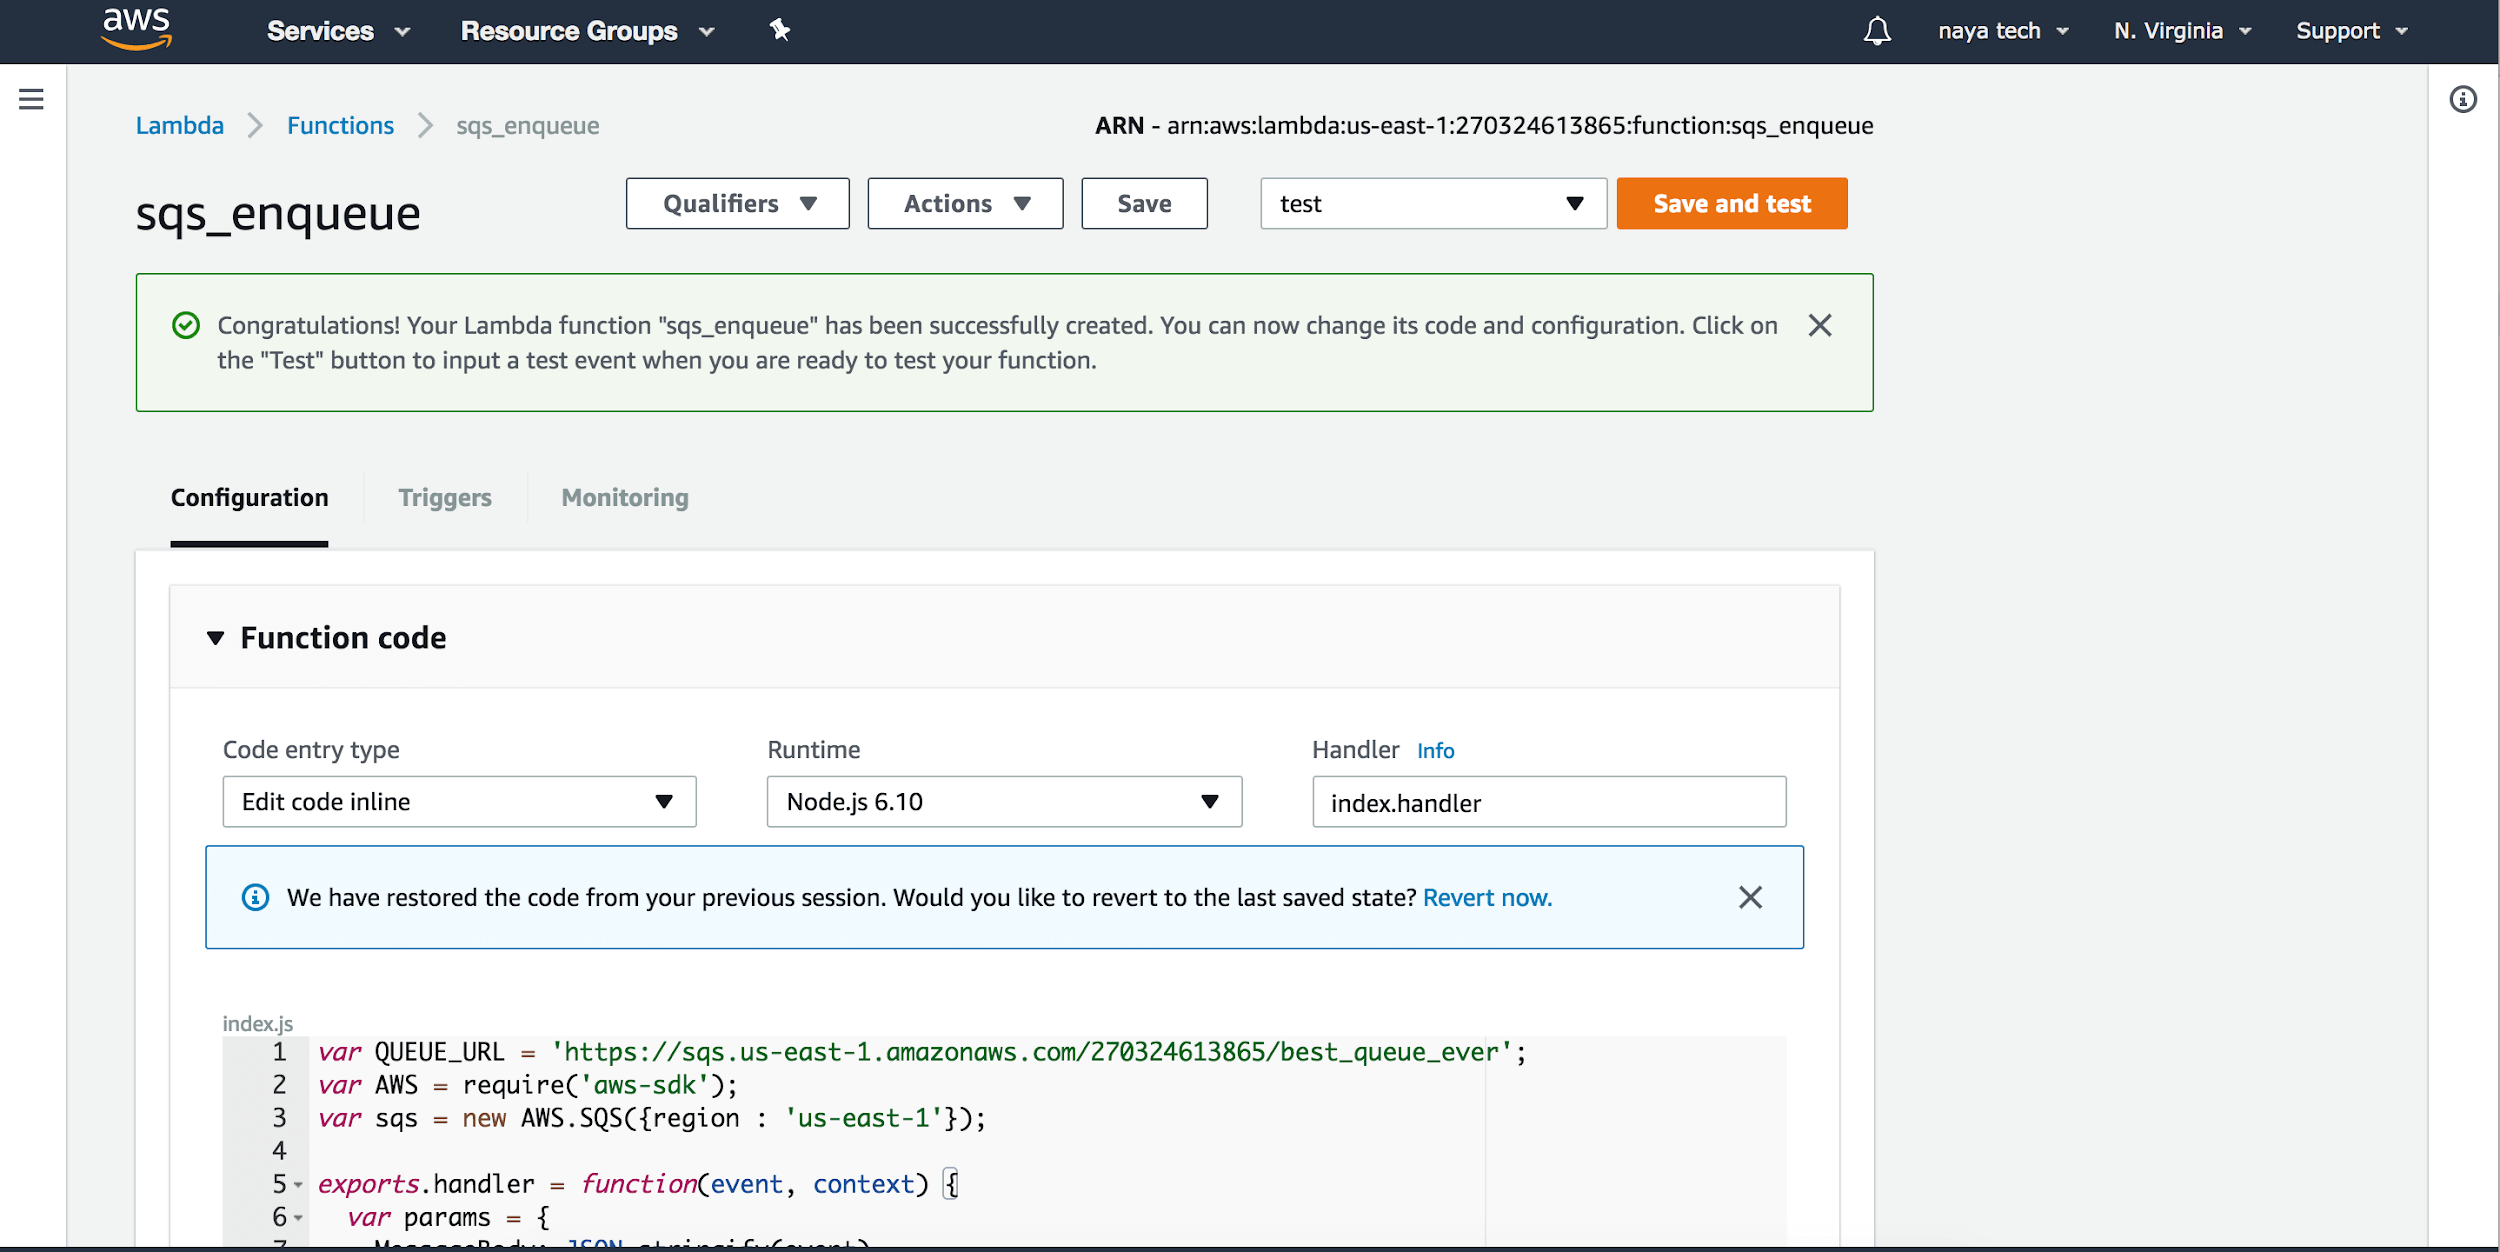
You will change the following reference code to fit the requirements. In the snippet below, replace https://QUEUE_URL with the queue URL of your SQS queue. Then employ it to replace the lawmaking in the lawmaking window.
![../Desktop/Screen%20Shot%202018-05-16%20at%204.42.00%20PM.png]()
1
ii
3
4
five
six
vii
viii
ix
ten
11
12
13
14
15
16
17
eighteen
nineteen
var QUEUE_URL = '<strong>https://QUEUE_URL</strong>' ;
var AWS = require ( 'aws-sdk' ) ;
var sqs = new AWS . SQS ( { region : 'us-eastward-i' } ) ;
exports . handler = function ( event , context ) {
var params = {
MessageBody : JSON . stringify ( event ) ,
QueueUrl : QUEUE _URL
} ;
sqs . sendMessage ( params , function ( err , information ) {
if ( err ) {
console . log ( 'error:' , "** Failed to write to queue **" + err ) ;
context . washed ( 'error' , "** ERROR writing to SQS **" ) ; // ERROR when trying to enqueue to SQS
} else {
console . log ( 'data:' , information . MessageId ) ;
context . washed ( null , '' ) ;
// SUCCESS - message written to SQS
}
} ) ;
}
The Lambda Function is pretty straightforward:
-
Yous configure the SQS queue URL, then that the Lambda Function can interact with the specific queue created earlier.
-
It loads the AWS SDK so that it can use the SQS API.
-
It constructs an SQS object in the region where the SQS queue resides (using new AWS.SQS). If your SQS queue has been created in a different region, change the region accordingly.
-
It calls the SQS API with the sqs.sendMessage call and sends the JSON Payload to the SQS Queue.
-
-
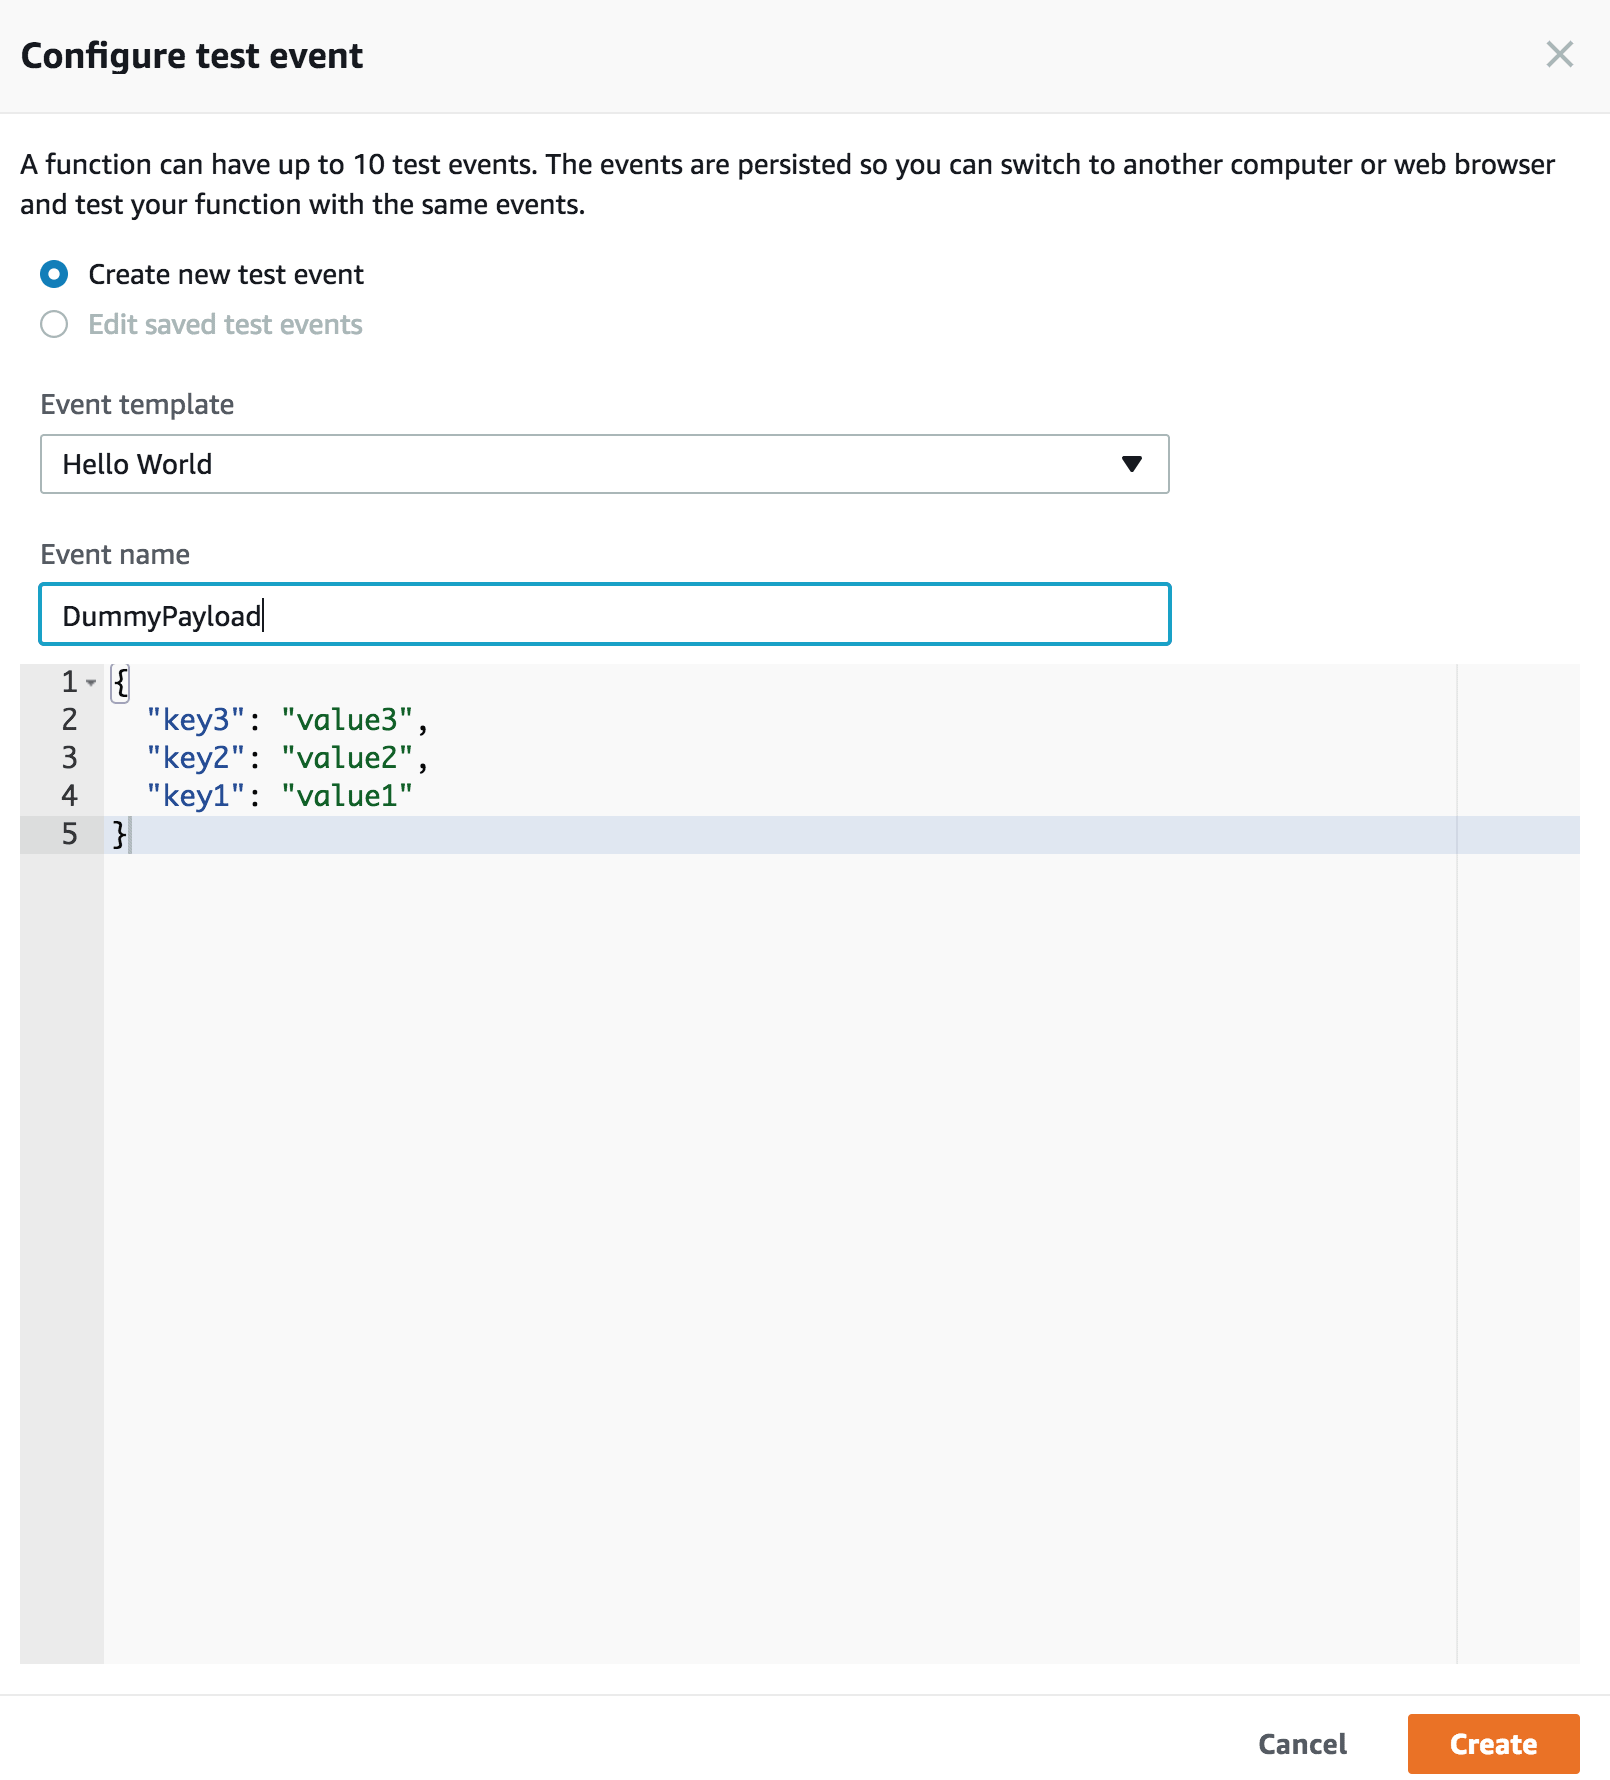
Click on the Save button to save the sqs_enqueue Lambda function and and then click Exam to examination its functionality past sending a mockup JSON Payload to the queue. This opens a window to create the test result. The specific contents of the JSON payload don't actually matter for testing the Lambda part. You lot can use the default examination event using the provided Howdy World template.
![]()
Give the effect a name, such as DummyPayload, and click Create.
-
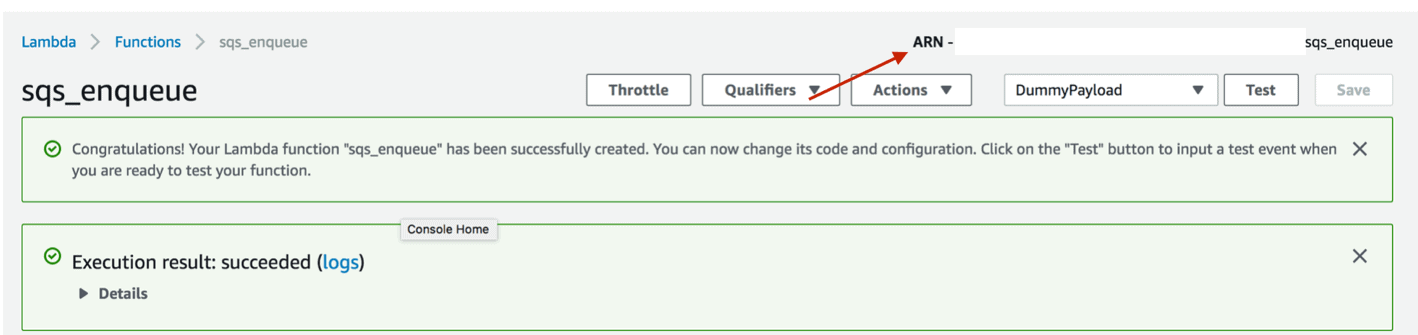
Click on the Examination push button to transport the JSON payload to the queue and verify that the sqs_enqueue Lambda function works correctly.
![]()
You should expect to come across an Execution result: succeeded message after clicking on the Test button which signifies that the message was written successfully to the queue.
![]()
-
Copy the ARN (Amazon Resources Proper name) for the Lambda office you but created. An ARN is used when you need to specify a resource unambiguously across all of AWS. In this example, you will apply this ARN in the Stored Procedure you volition create in the Aurora MySQL database.
![../Desktop/Screen%20Shot%202018-05-16%20at%204.45.37%20PM.png]()
-
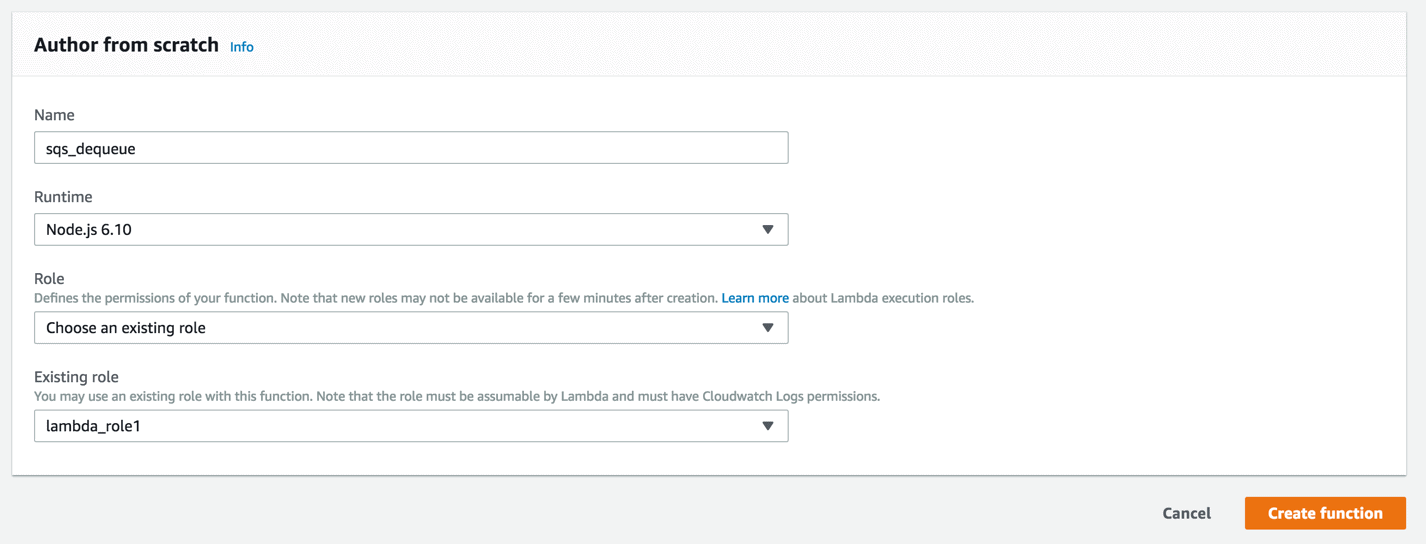
Echo the aforementioned steps to create the second Lambda Part sqs_dequeue, used to dequeue (read) messages from the SQS queue.
-
When creating the sqs_dequeue Lambda function, under role, select Cull an existing office and select the lambda_role1 office you created when you created the sqs_enqueue Lambda part.
![../Desktop/Screen%20Shot%202018-05-16%20at%204.48.03%20PM.png]()
-
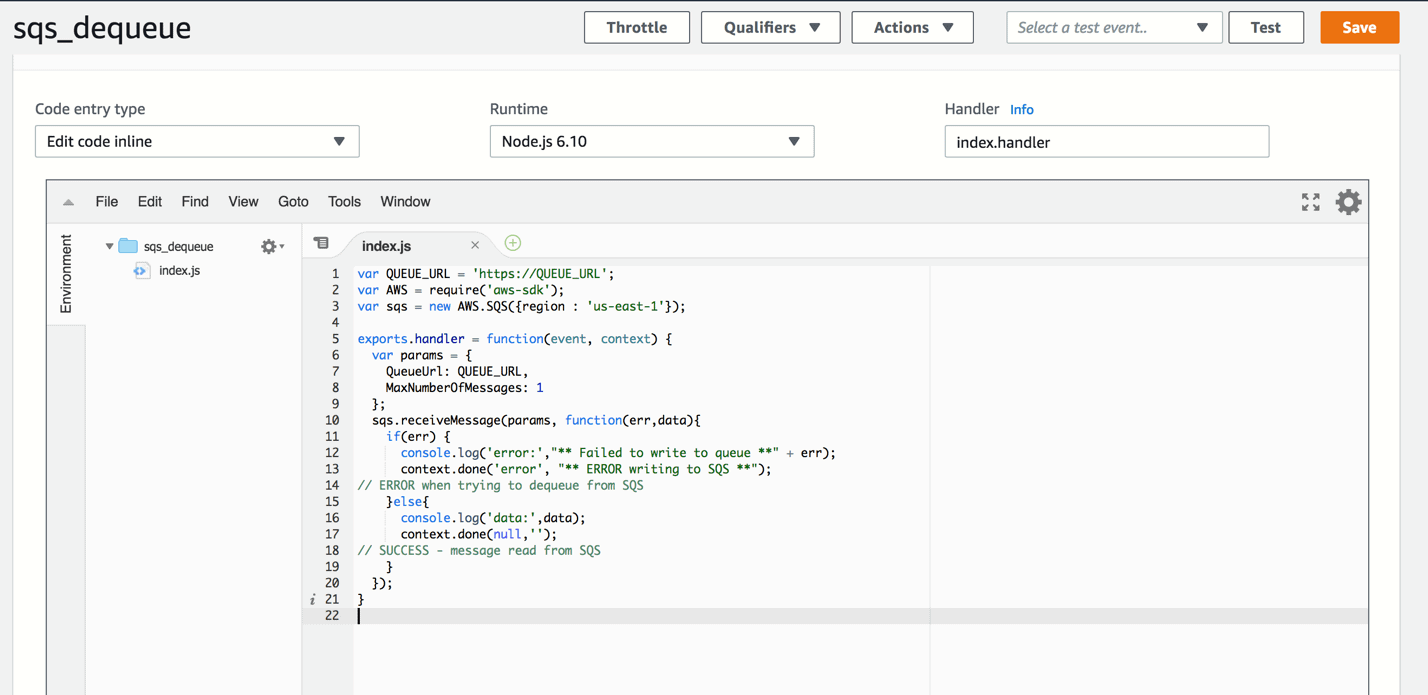
Use the code beneath for the sqs_dequeue Lambda function. Remember to replace the QUEUE_URL with the URL for your SQS Queue and your region. Note that this fourth dimension you lot are using the sqs.receiveMessage API phone call.
![../Desktop/Screen%20Shot%202018-05-16%20at%204.52.57%20PM.png]()
ane
2
3
4
v
vi
7
8
9
10
11
12
13
fourteen
xv
xvi
17
18
19
xx
var QUEUE_URL = '<strong>https://QUEUE_URL</stiff>' ;
var AWS = require ( 'aws-sdk' ) ;
var sqs = new AWS . SQS ( { region : 'u.s.a.-east-ane' } ) ;
exports . handler = function ( event , context ) {
var params = {
QueueUrl : QUEUE_URL ,
MaxNumberOfMessages : 1
} ;
< strong > sqs . receiveMessage < / strong > ( params , function ( err , data ) {
if ( err ) {
console . log ( 'error:' , "** Failed to write to queue **" + err ) ;
context . done ( 'error' , "** Mistake writing to SQS **" ) ;
// Error when trying to dequeue from SQS
} else {
console . log ( 'data:' , data ) ;
context . done ( naught , '' ) ;
// SUCCESS - message read from SQS
}
} ) ;
}

Configure your AWS Aurora MySQL Instance
Now information technology'south time to prepare up your Amazon Aurora w/MySQL Compatibility Cluster and create the MySQL Stored Procedure which volition be used to invoke the Lambda functions for dequeuing and enqueuing messages from and to SQS.
Note that there are several steps required in guild for an Aurora MySQL cluster to successfully invoke Lambda functions. Otherwise, y'all tin run across permission issues. You will demand to do the following:
-
Create a new IAM Role.
-
Assign the AWSLambdaFullAccess policy to the role so that the IAM Role will be able to execute Lambda Part API calls.
-
Create a new custom DB Cluster Parameter Group.
-
Alter the aws_default_lambda_role parameter with the value of the IAM Role ARN then that the Aurora MySQL instance will have permissions to invoke AWS Lambda function.
-
Create a new Aurora MySQL Cluster, using the custom Cluster Parameter Group.
-
Create a stored procedure invoking the Lambda part using the Lambda role ARN.
It'due south actually much simpler than it looks. Let'south get started!
Configure IAM Part and Create a Cluster Parameter Grouping
Beginning by creating an IAM Function to which you lot will acquaintance permissions to execute Lambda functions. Later, you will attach this IAM Office to your AWS Aurora Cluster.
-
Navigate to the AWS IAM Service page by clicking on Services and typing iam. Select IAM.
![]()
-
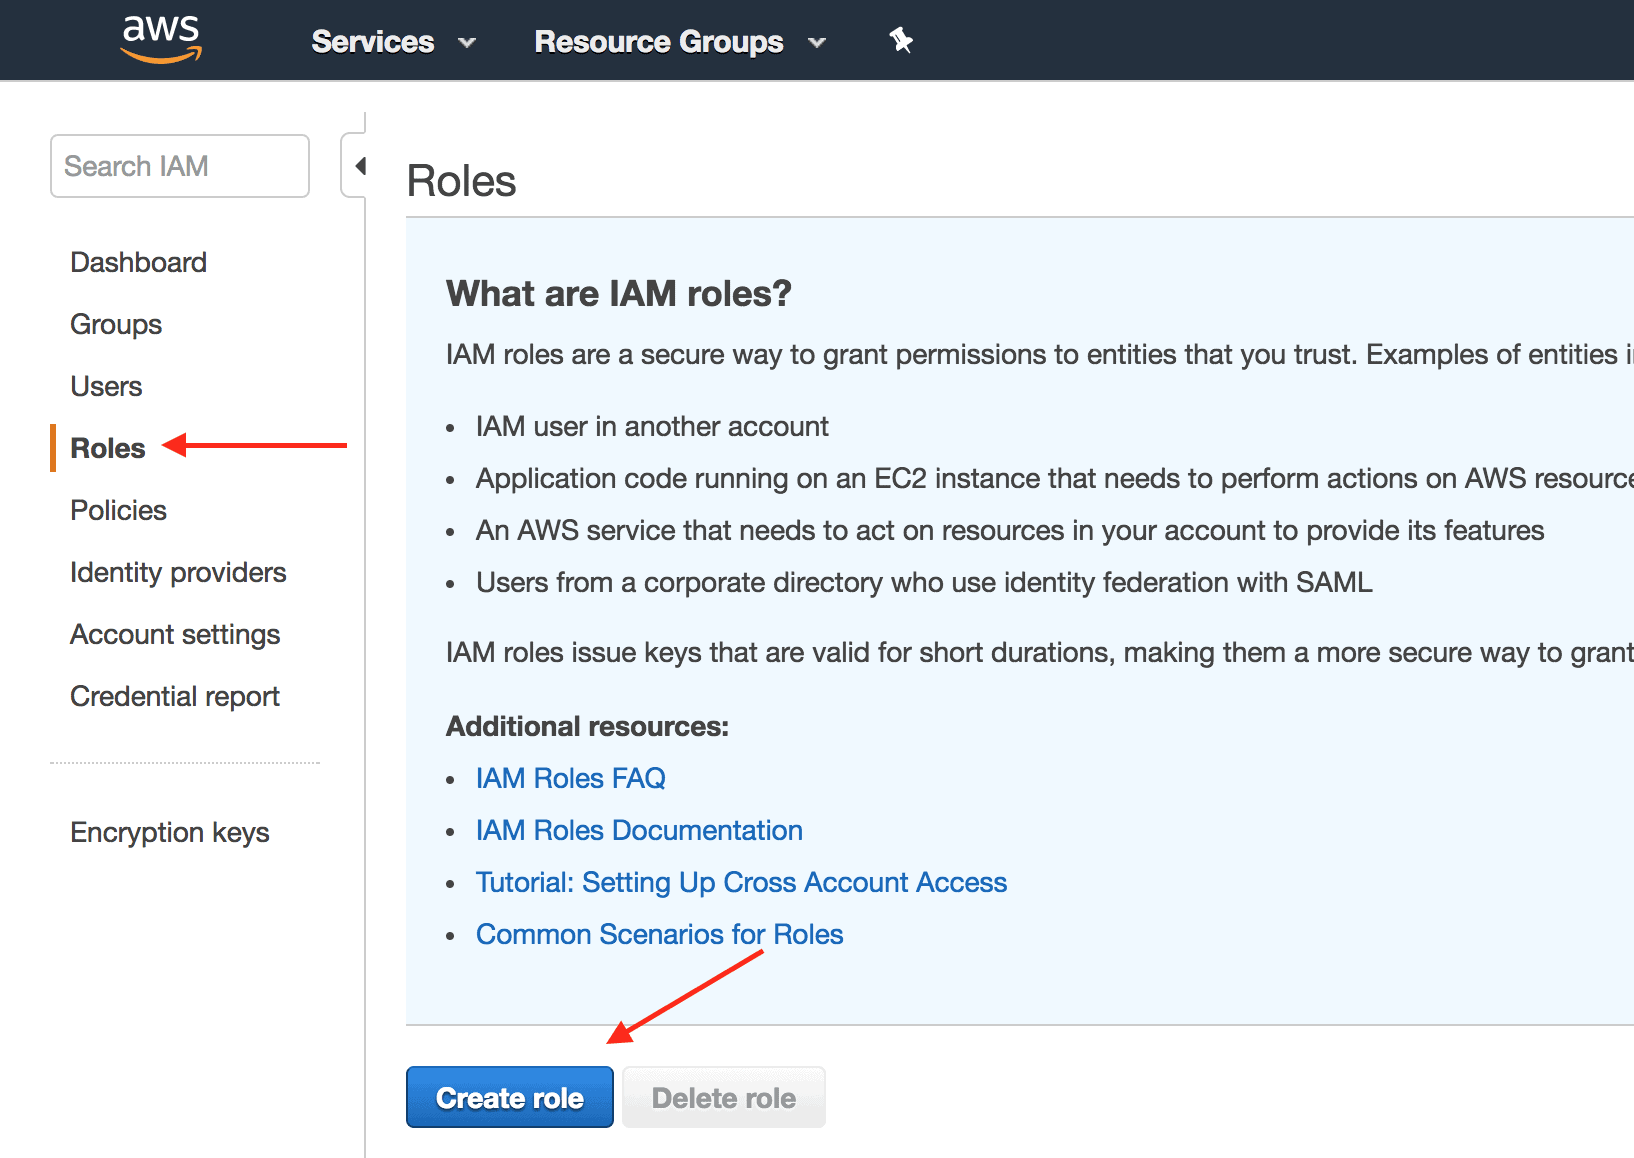
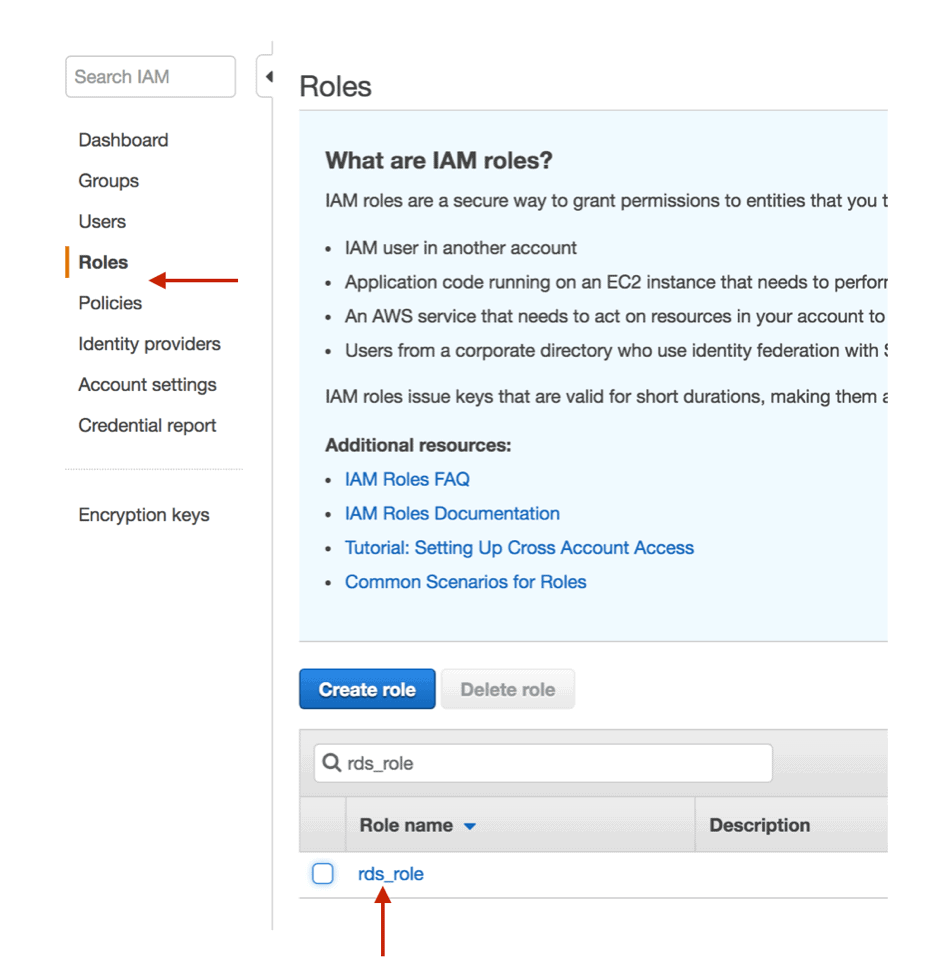
In one case on the IAM Service folio, click on Roles and select Create Role.
![]()
-
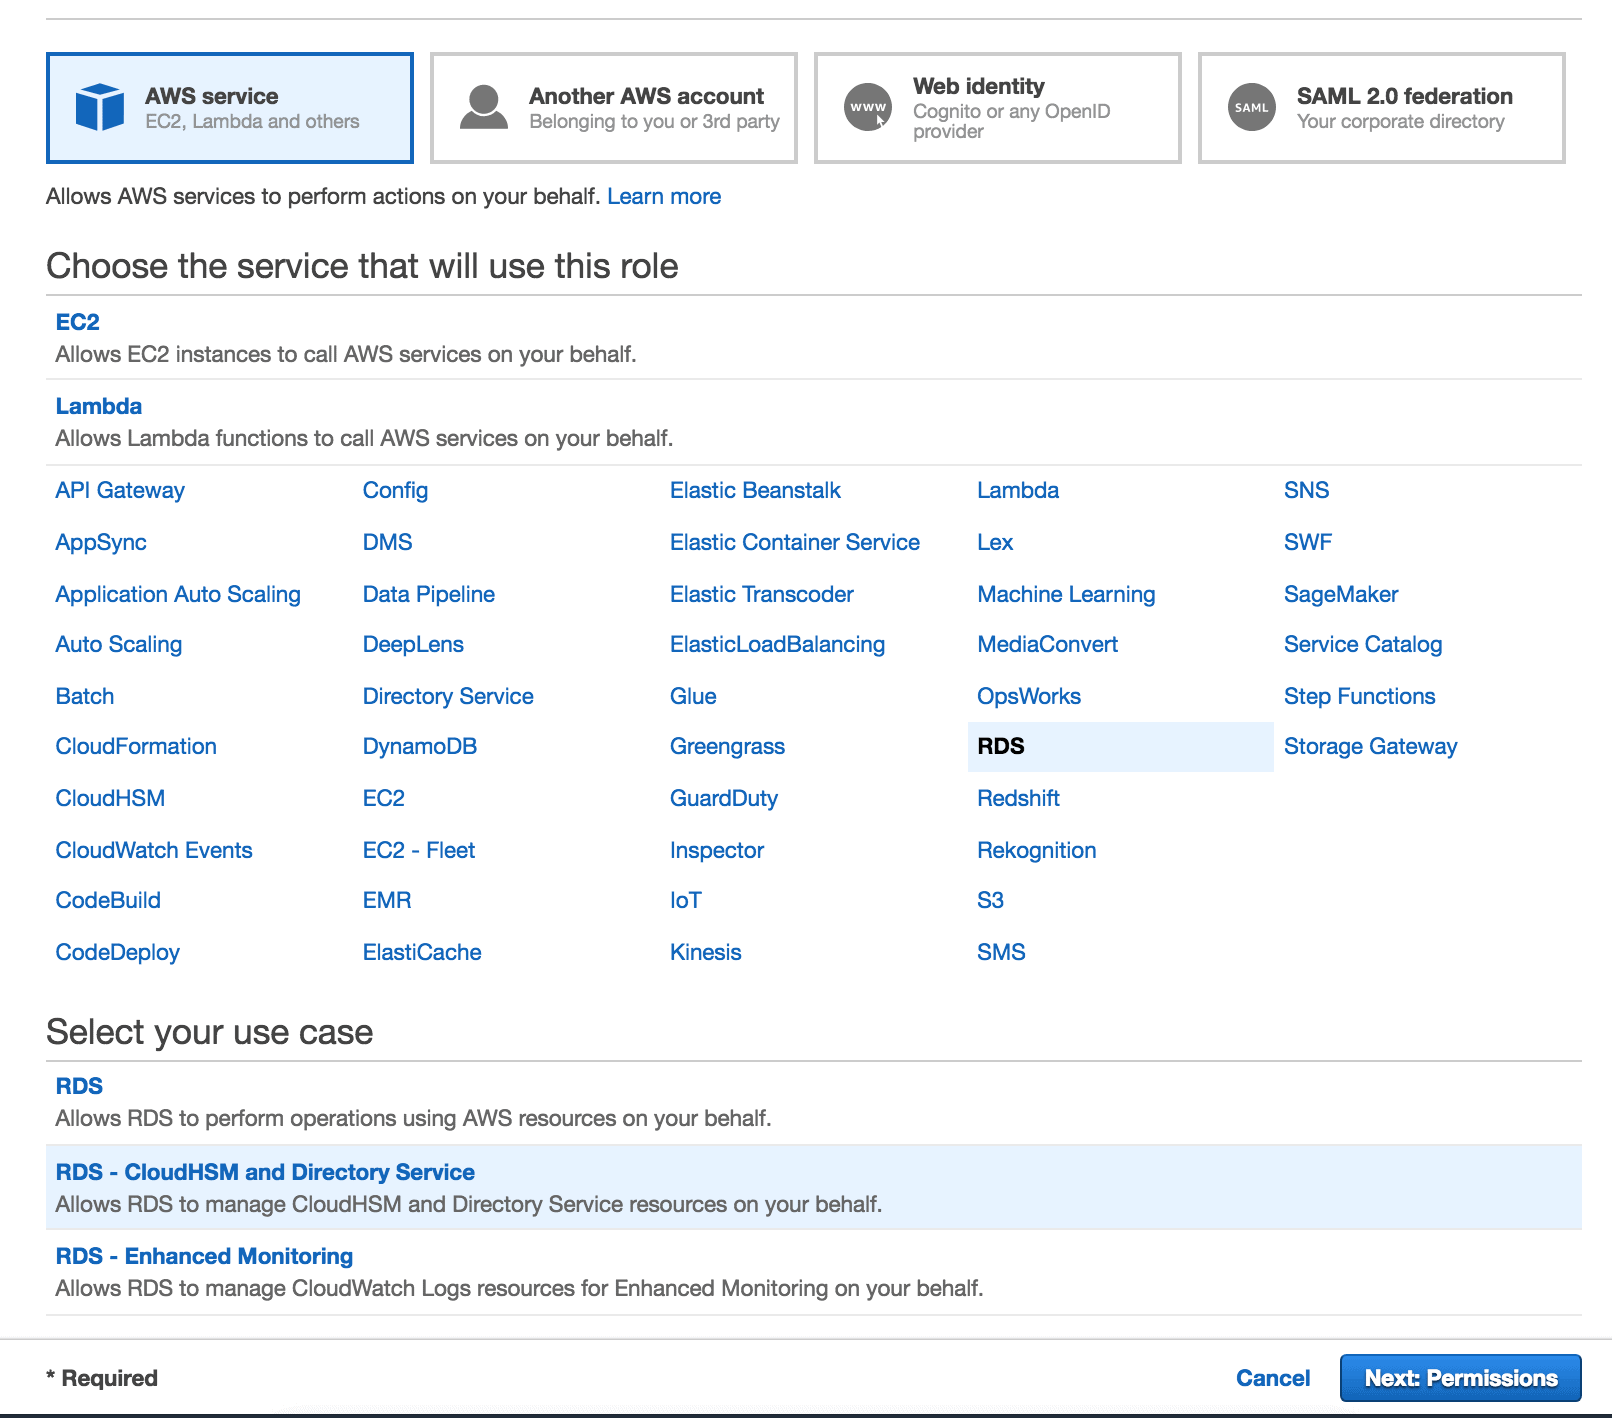
Select AWS Service equally the part type, RDS equally the Service that will apply this role and RDS – Cloud HSM and Directory Services for the Use Case. Click on Next: Permissions once done.
![../Desktop/Screen%20Shot%202018-05-16%20at%207.05.57%20PM.png]()
-
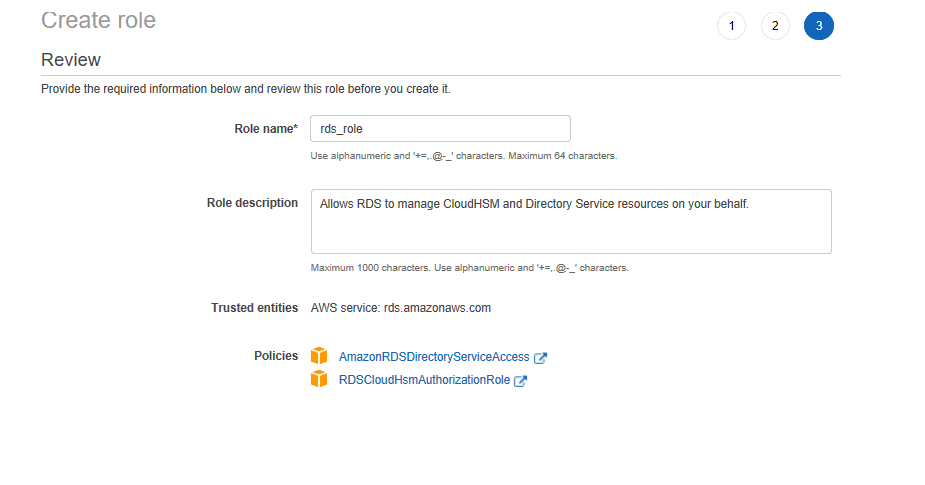
Go out the settings as-is on the next screen and click Adjacent: Review. On the post-obit screen, provide the function with a name, such every bit rds_role, and click Create Part
![]()
-
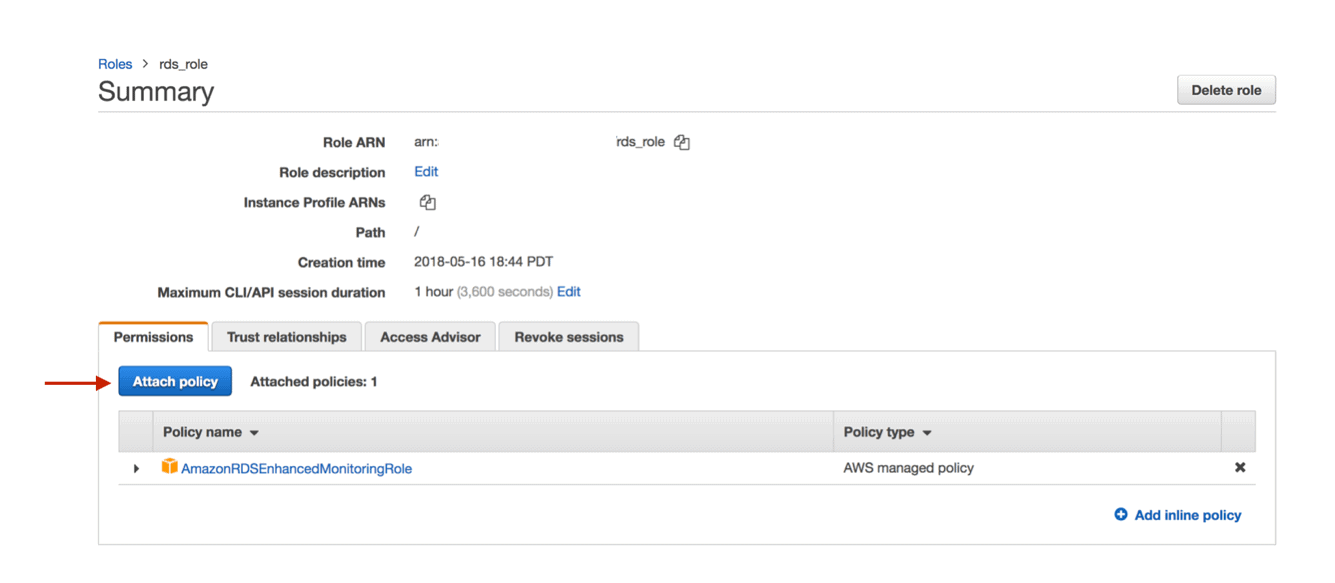
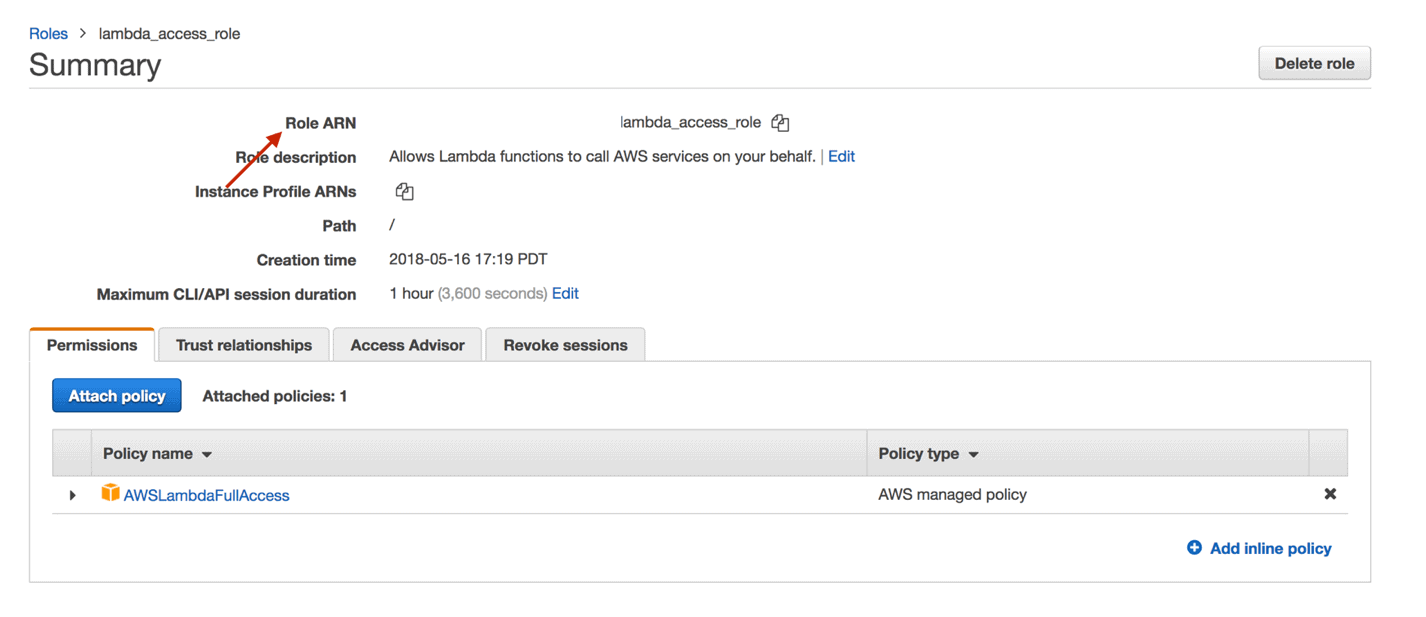
After the role has been created, you demand to add together a policy to this role which allows for execution of Lambda functions. To accomplish that, in your IAM Service folio, click on Roles and the name of the IAM Office you take but created – rds_role.
![../Desktop/Screen%20Shot%202018-05-16%20at%206.44.56%20PM.png]()
-
Click Attach Policy to select the policies you want granted to the IAM Function
![../Desktop/Screen%20Shot%202018-05-16%20at%206.46.54%20PM.png]()
-
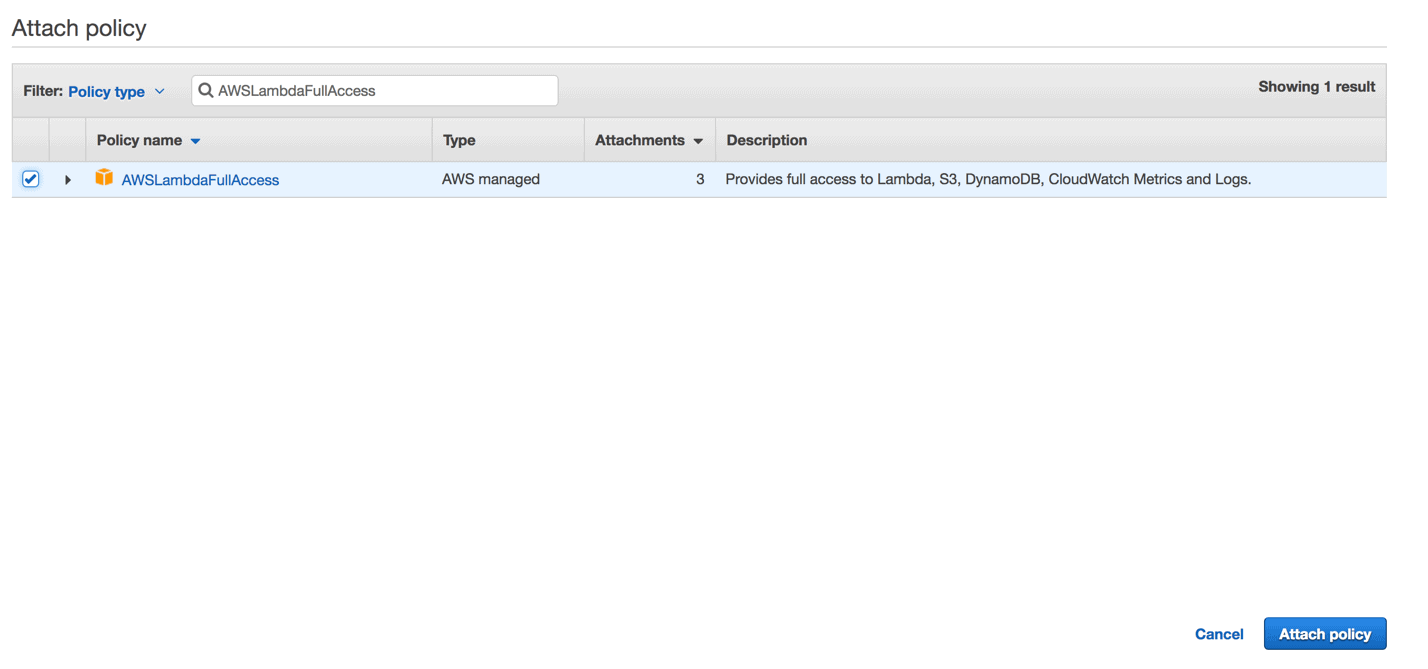
On the next screen, search for the AWSLambdaFullAccess policy name, select the checkbox side by side to information technology. The AWSLambdaFullAccess policy grants total admission to Amazon Lambda. In a production surroundings, you volition probably want to be more granular with the permissions y'all grant, but for this demo, granting the AWSLambdaFullAccess function is ok. Click Attach Policy.
![../Desktop/Screen%20Shot%202018-05-16%20at%206.50.24%20PM.png]()
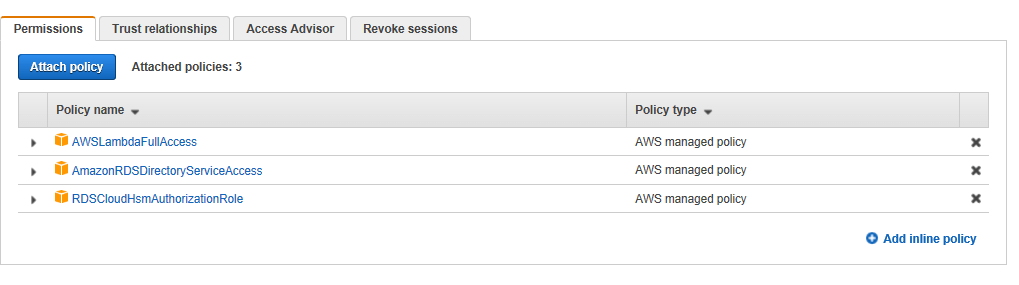
Your new IAM Role now has the AWSLambdaFullAccess policy attached to it.
![]()
-
Copy the Role ARN and store it somewhere safe. Y'all will need to use this value for a parameter in the AWS Aurora Cluster Parameter Grouping.
![../Desktop/Screen%20Shot%202018-05-16%20at%205.44.56%20PM.png]()

Create a new Cluster Parameter Group
After the IAM Part has been created, you lot will need to create a custom Aurora Cluster Parameter Grouping. This is required, every bit without doing and so, your Aurora Cluster won't have the permissions to Invoke Lambda functions.
-
Click Services add type rds. Select RDS to open the RDS Service Dashboard.
![]()
-
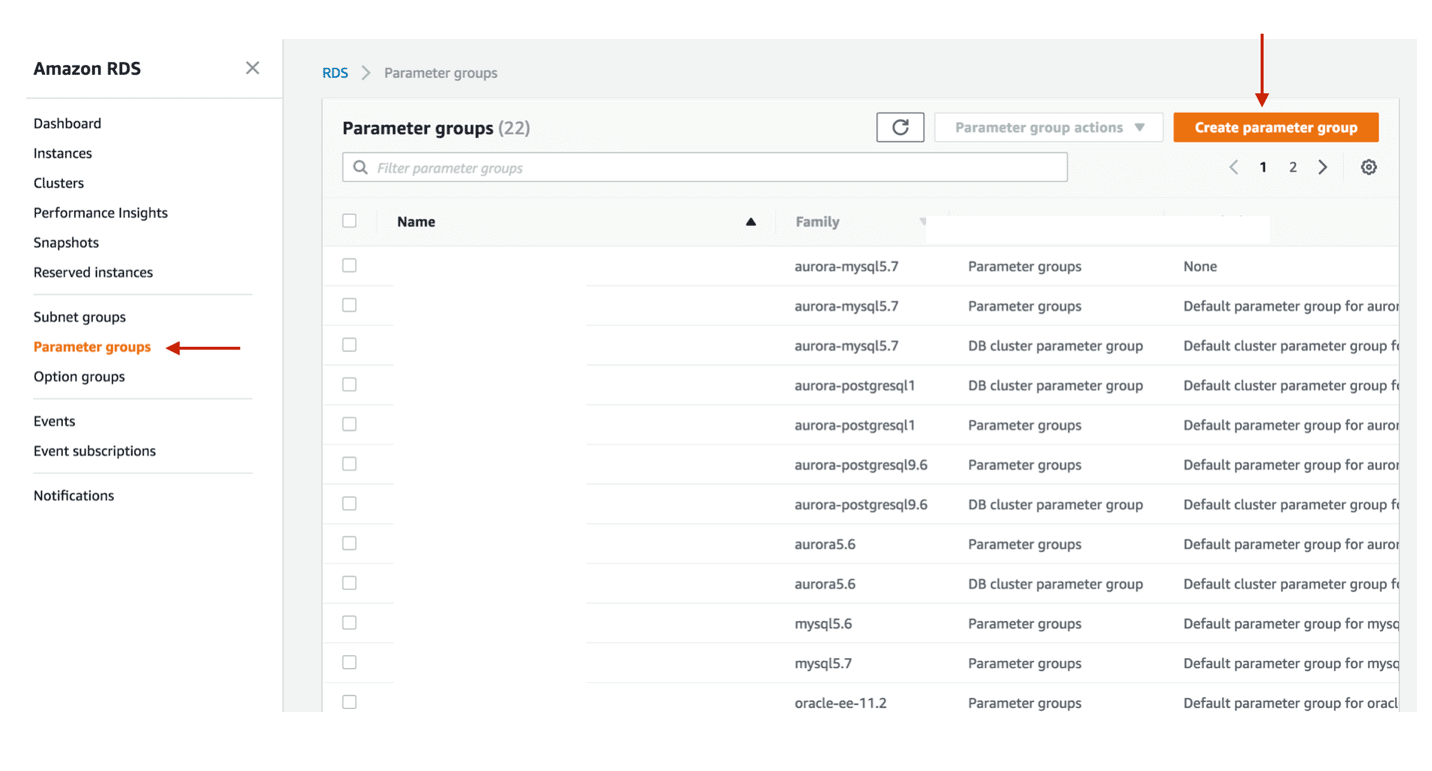
Select Parameter Groups from the RDS Dashboard and click Create Parameter Grouping.
![../Desktop/Screen%20Shot%202018-05-16%20at%205.47.47%20PM.png]()
-
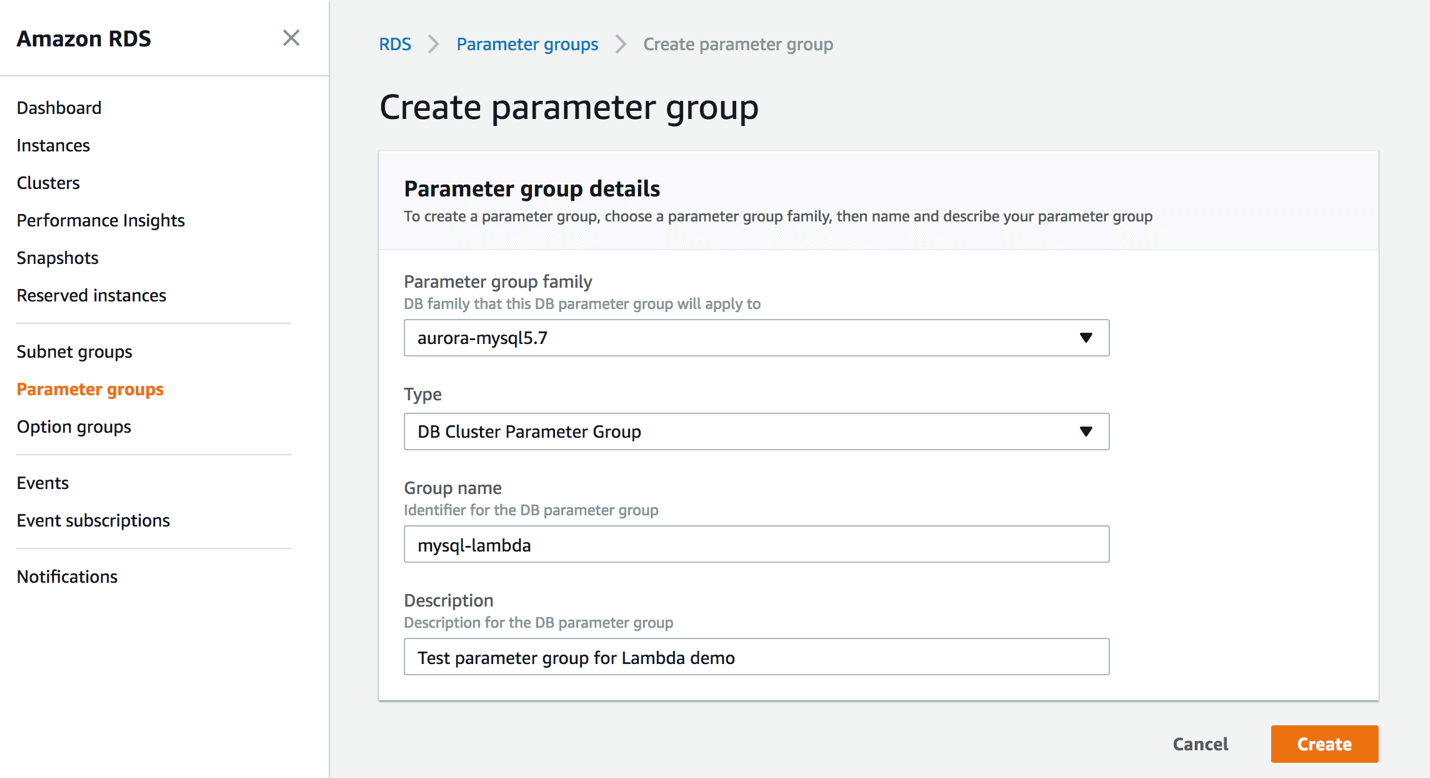
Choose aurora-mysql5.vii as the Parameter group family (this is the Parameter Group Family for Aurora w/MySQL compatibility version five.7), select DB Cluster Parameter Group for the Type and enter a Group proper name and description. I'k using mysql-lambda for my demo. Yous volition also need to enter a description for the parameter group.
![../Desktop/Screen%20Shot%202018-05-16%20at%205.49.51%20PM.png]()
Once done, click Create.
-
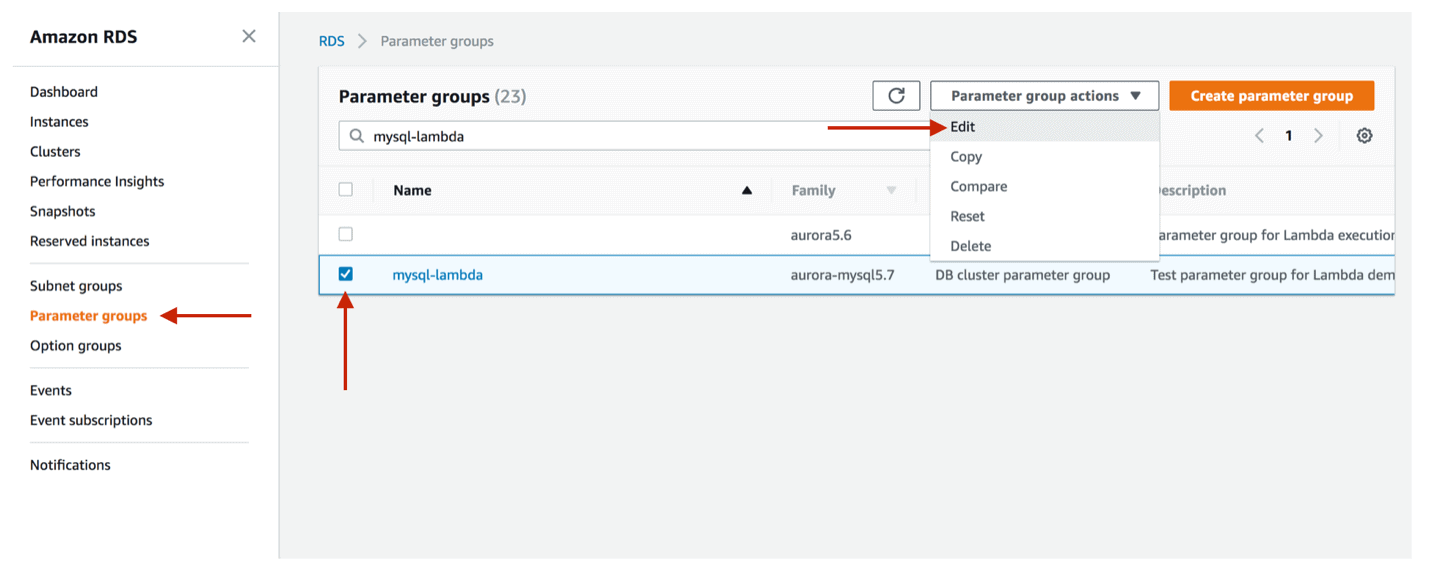
Back in the RDS Service page, navigate to Parameter Groups, select the custom DB Cluster Parameter Group you have created for your AWS Aurora MySQL Cluster, click on Parameter group actions and choose Edit.
![../Desktop/Screen%20Shot%202018-05-16%20at%205.52.57%20PM.png]()
-
Search for a parameter with the proper noun: aws_default_lambda_role, and for the value of this parameter, enter the IAM Role ARN from the earlier step when creating the office.
![../Desktop/Screen%20Shot%202018-05-16%20at%205.56.26%20PM.png]()
Click on Salvage Changes.

Create your AWS Aurora MySQL Instance
Subsequently your IAM Role and custom Cluster Parameter Group have been created, you can provision your Aurora MySQL cluster.
-
Click Services and blazon rds. Select RDS to open the RDS Service Dashboard.
![]()
-
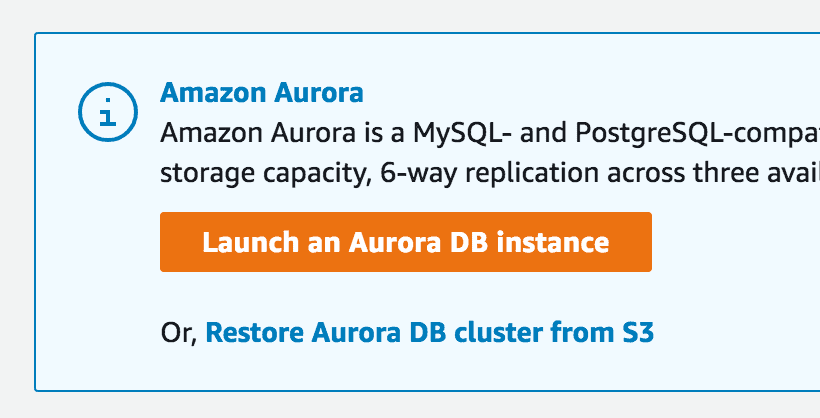
In the RDS Dashboard main screen click on Launch an Aurora DB instance. You lot may have to click Go started now if this is the commencement time you lot accept been to this dashboard.
![../Desktop/Screen%20Shot%202018-05-16%20at%205.59.08%20PM.png]()
-
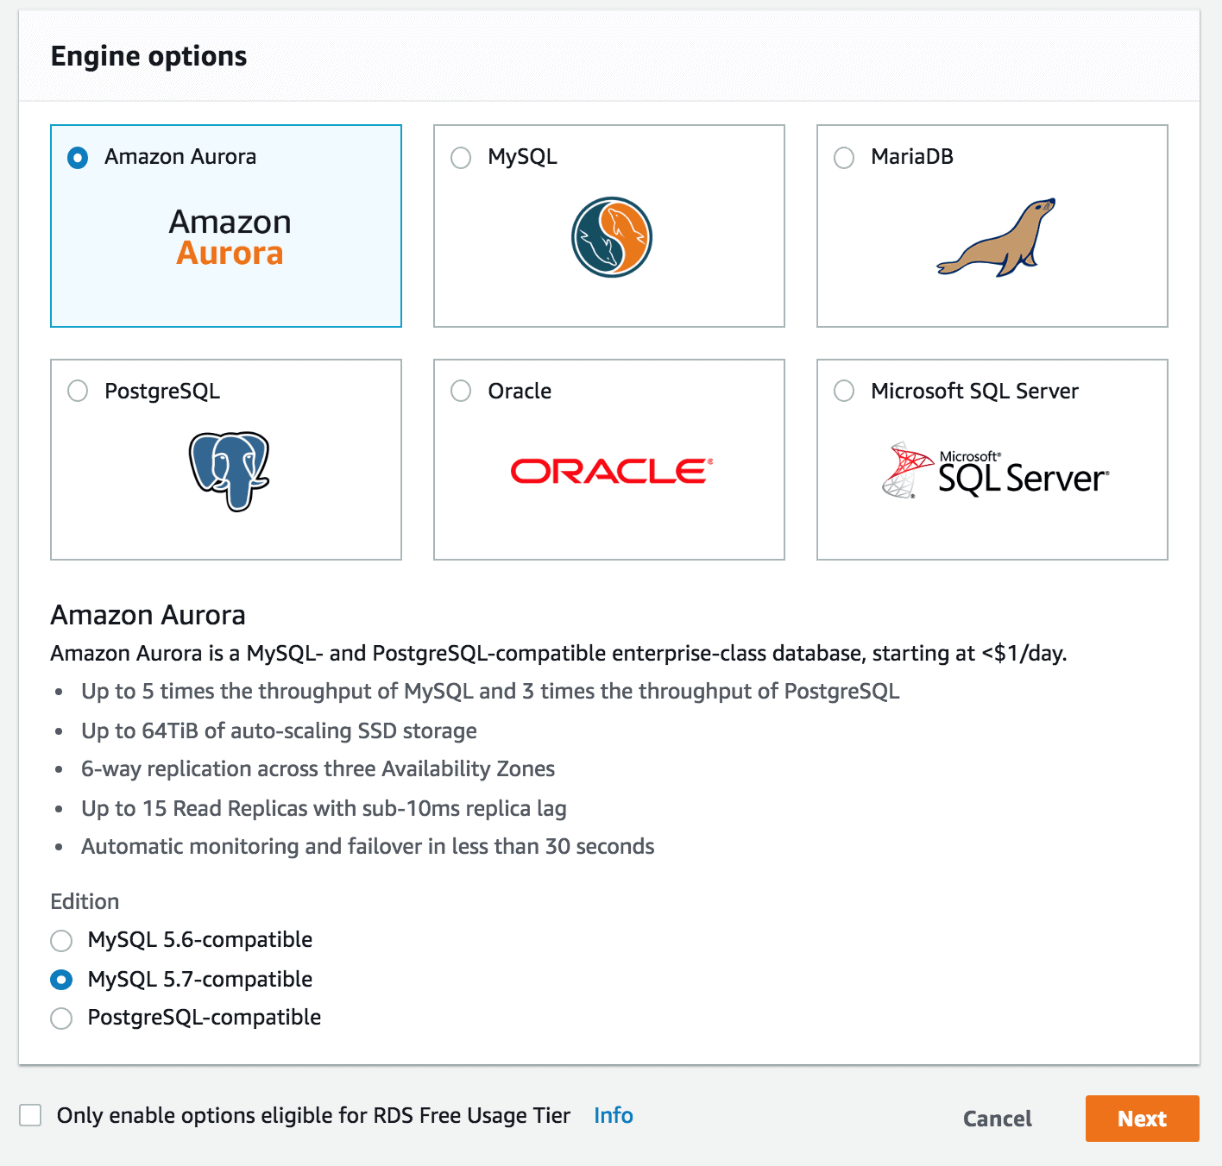
Select Amazon Aurora and choose the MySQL-v.7 compatible edition. Click Adjacent.
![../Desktop/Screen%20Shot%202018-05-16%20at%206.00.20%20PM.png]()
-
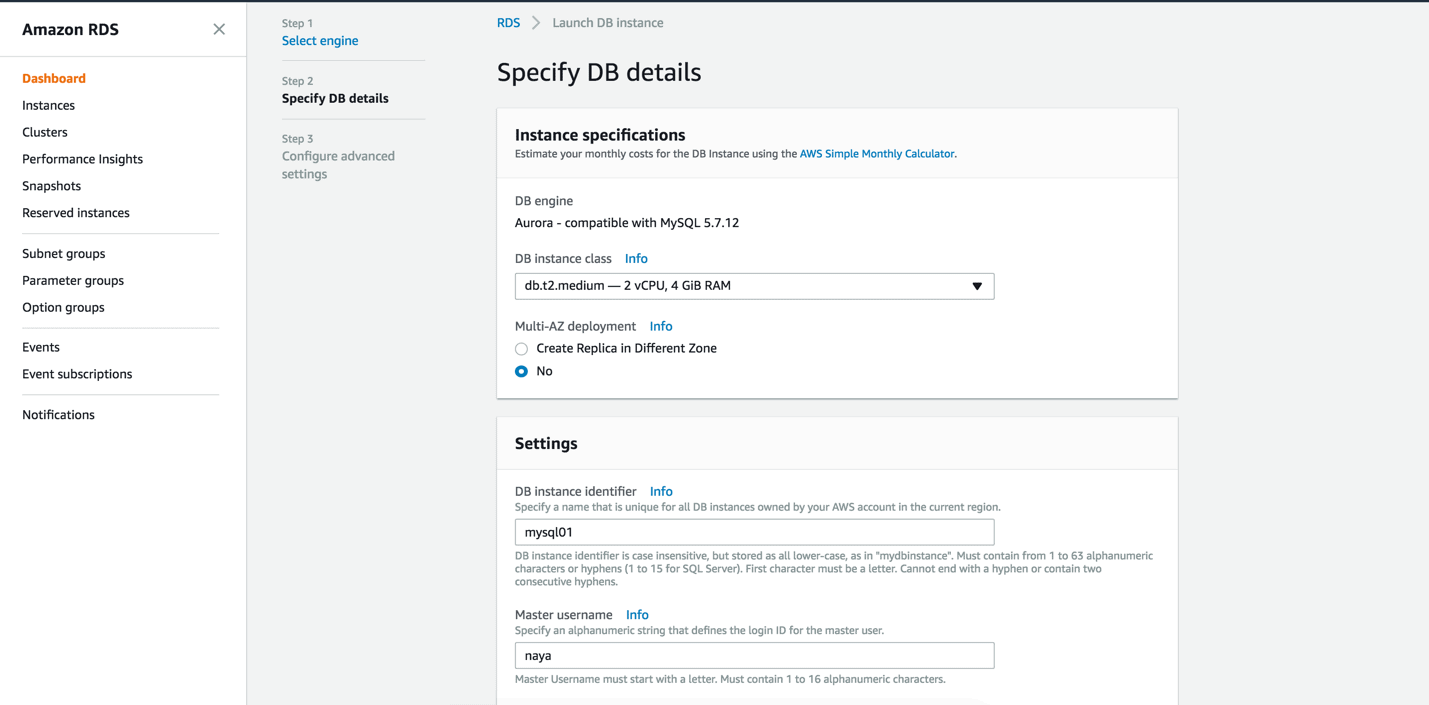
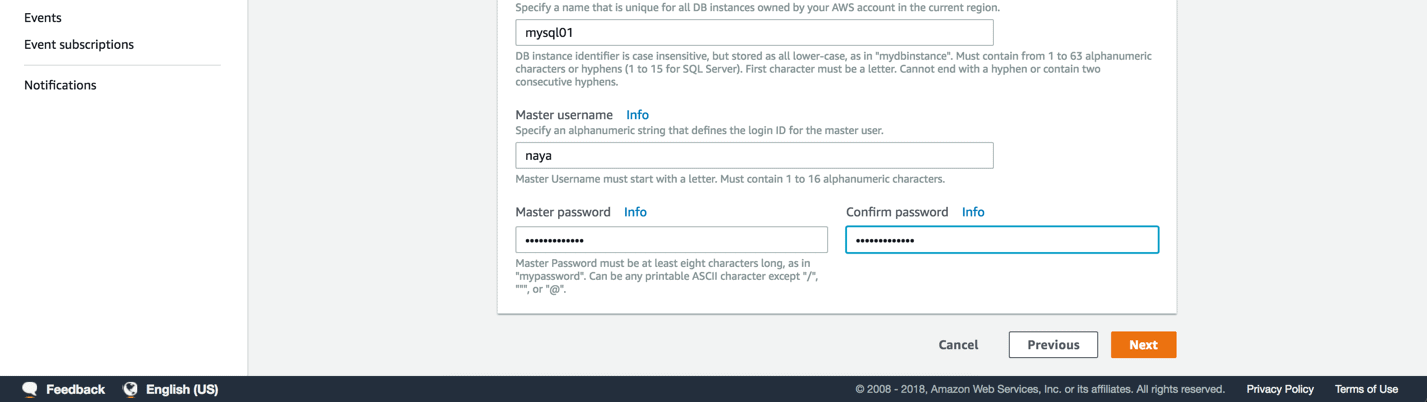
Specify the DB Instance Grade for your database (which determines the number of CPUs and RAM allocated to the Aurora instances), specify the Multi-AZ Deployment pick which volition create automated replicas of your MySQL instance in multiple AZs for increased high availability and read scalability and a proper noun for the database (such as mysql01). As well create a Primary username and Principal countersign.
![../Desktop/Screen%20Shot%202018-05-16%20at%206.01.46%20PM.png]()
![../Desktop/Screen%20Shot%202018-05-16%20at%206.01.52%20PM.png]()
Click Adjacent one time done.
-
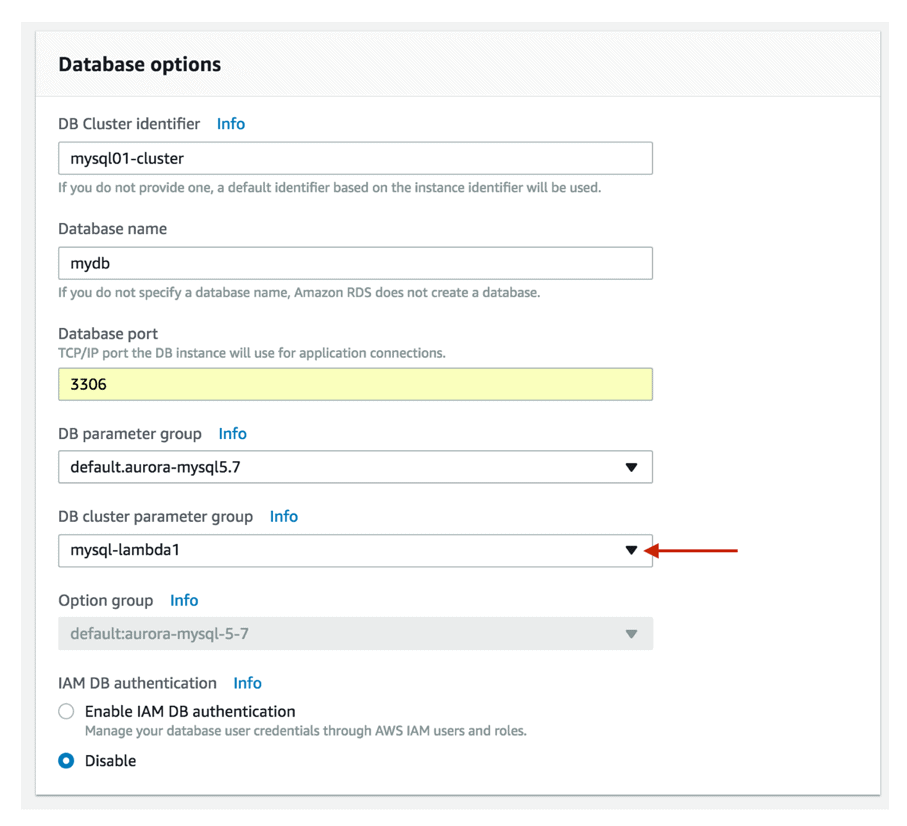
Specify the desired network, security and database options for your AWS Aurora MySQL Cluster. For example, selecting Aye for Public accessibility will make your Aurora MySQL cluster accessible from the internet. You can also choose the VPC security group which determines the rules for allowing or disabling connections to your cluster. The default options are fine for our demo but are usually non suited for production databases.
![../Desktop/Screen%20Shot%202018-05-16%20at%206.05.54%20PM.png]()
-
Further down the screen, provide a proper name for your Aurora MySQL cluster and for the database – mysql-cluster01 and mydb in my environment. Likewise brand sure you select the custom Cluster Parameter Group you lot have created earlier under the DB Cluster Parameter Group option. Without doing so, you will not exist able to invoke Lambda functions from within your Aurora MySQL database.
![../Desktop/Screen%20Shot%202018-05-16%20at%206.14.39%20PM.png]()
-
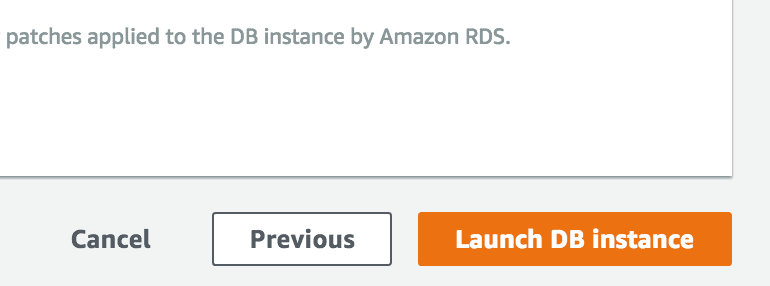
Accept the defaults for the remaining options and click Launch DB example at the lesser of the screen to create the cluster.
![../Desktop/Screen%20Shot%202018-05-16%20at%206.17.16%20PM.png]()
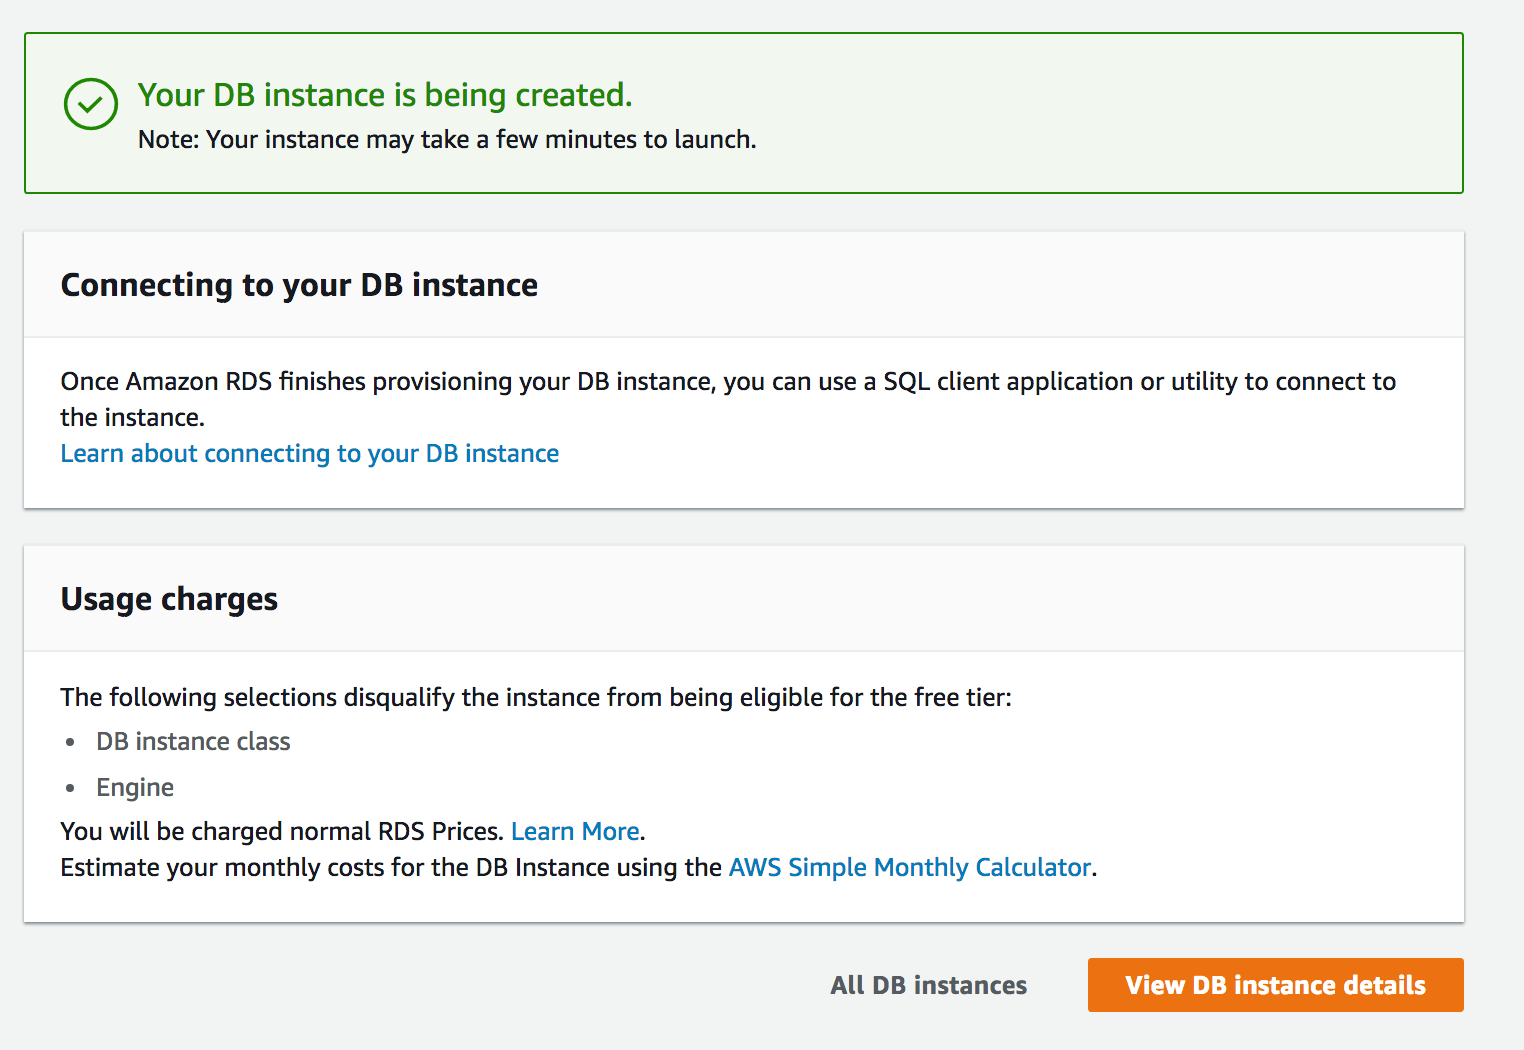
You will be presented with a notification indicating that your Aurora MySQL Cluster is beingness created.
![../Desktop/Screen%20Shot%202018-05-16%20at%206.18.27%20PM.png]()
-
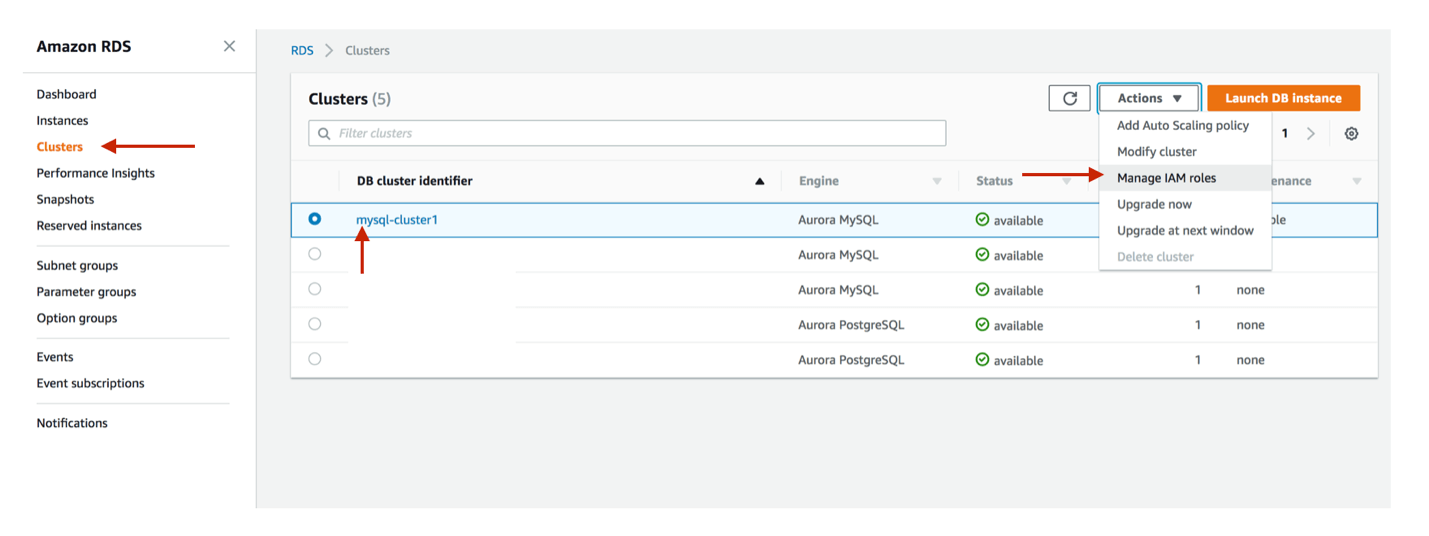
After your AWS Aurora MySQL Database Cluster is ready, you will demand to assign the IAM Role you created earlier. In the RDS Dashboard screen, click on Clusters, select the Aurora MySQL cluster you accept just created and click on Deportment followed by Manage IAM Roles.
![../Desktop/Screen%20Shot%202018-05-16%20at%206.21.40%20PM.png]()
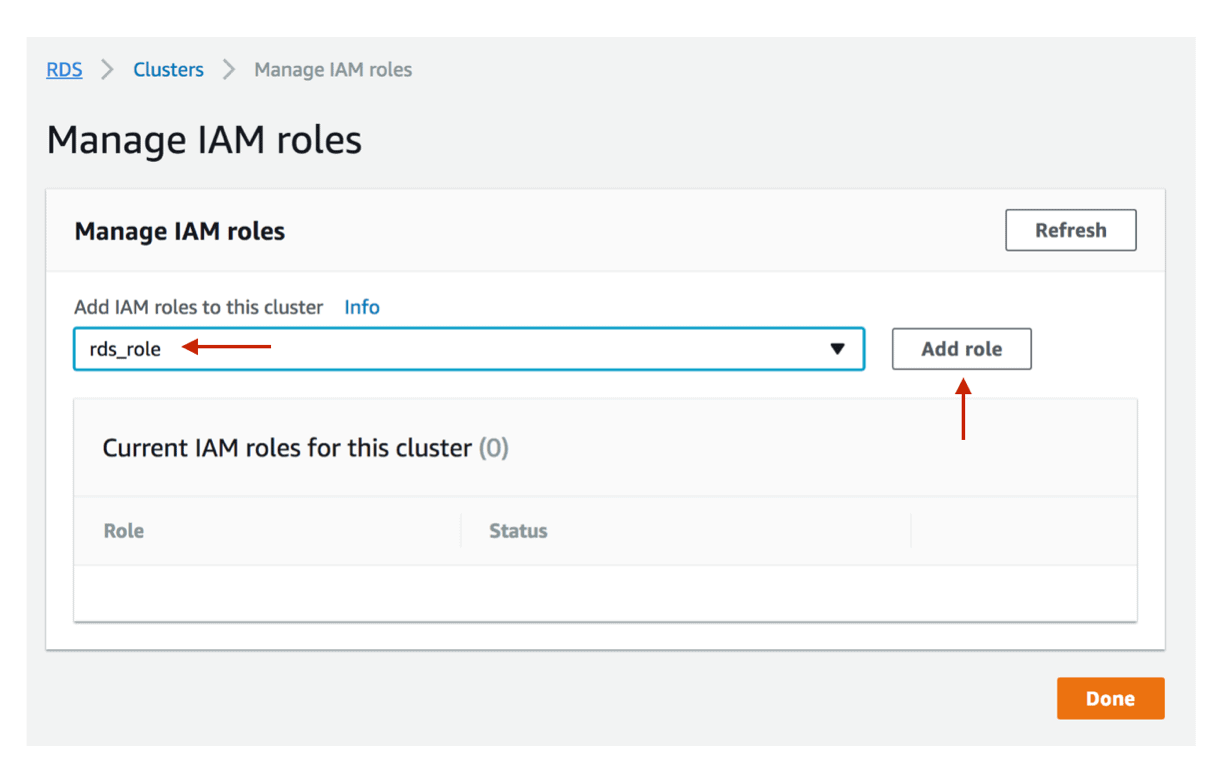
-
Choose the IAM Function you have created earlier (rds_role) and click Add together role.
![../Desktop/Screen%20Shot%202018-05-16%20at%207.14.21%20PM.png]()
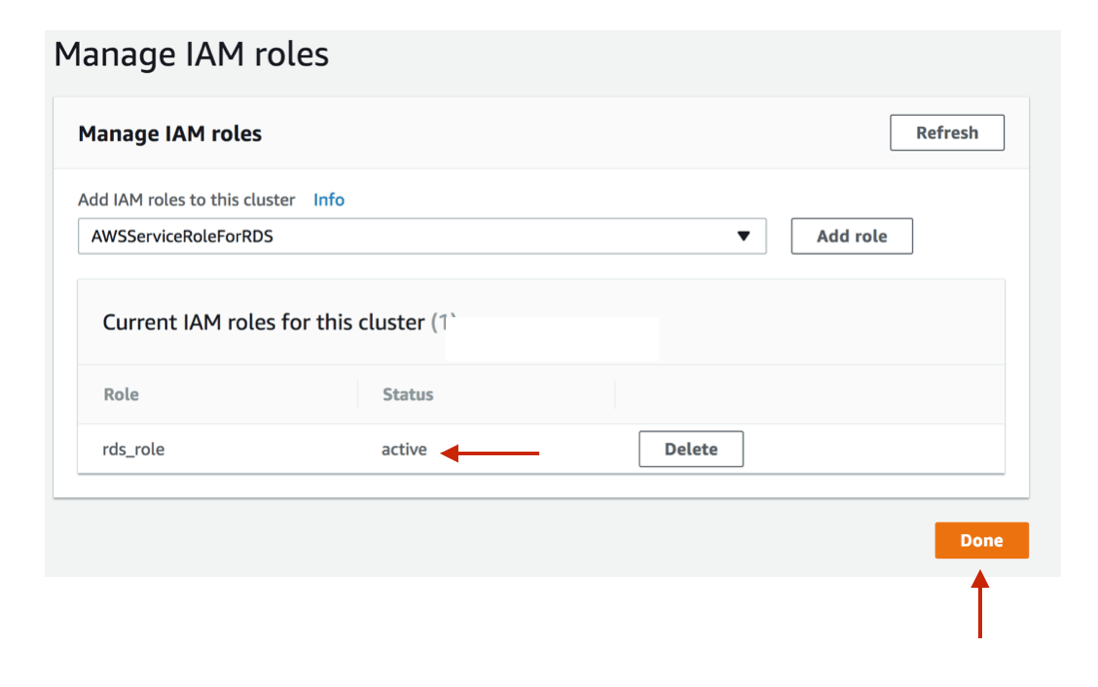
-
Await until the changes have been applied to your AWS Aurora MySQL Cluster and make sure no restart is required. After Condition changes to Agile click on Done.
![../Desktop/Screen%20Shot%202018-05-16%20at%207.15.43%20PM.png]()


Create the Stored Procedure That Will Execute the Lambda Function
If you reached this far, it ways that you have completed all of the prerequisites steps required to permit Aurora MySQL access to invoke your Lambda function and as such, enqueue and dequeue messages to SQS.
-
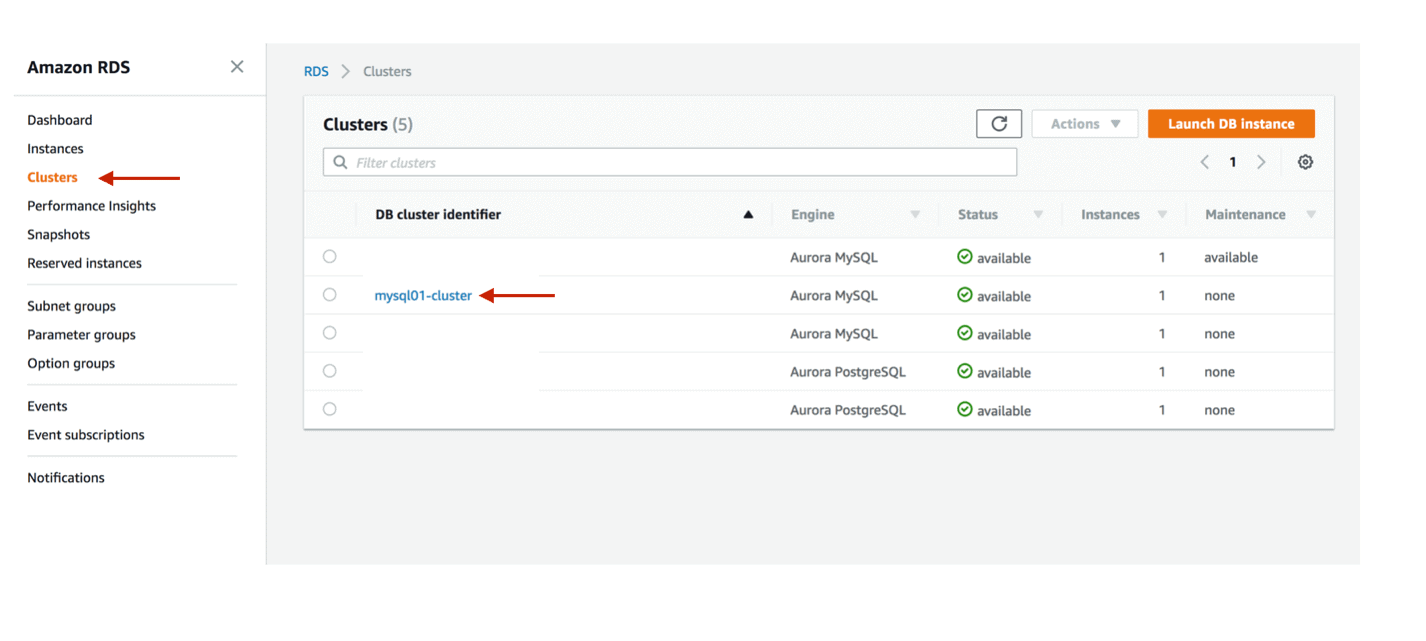
-
In the Amazon RDS panel, click on Clusters and click on the proper noun of the Aurora MySQL Cluster you have created earlier.
![Screen%20Shot%202018-05-16%20at%207.17.33%20PM.png]()
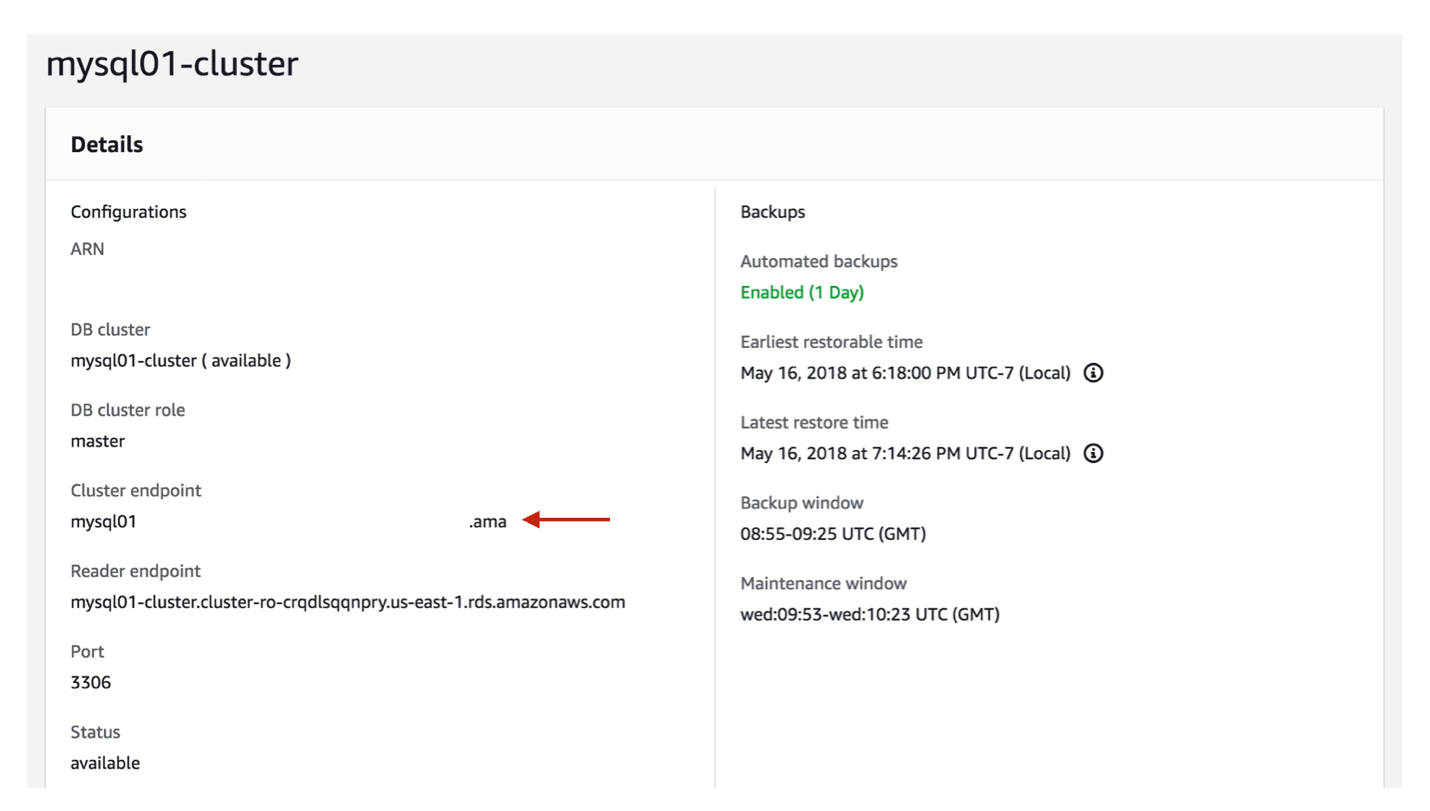
-
Copy the DNS accost that appears under Cluster endpoint. This is the DNS address of your Cluster and the i you will apply when configuring your connection. Be sure to choose the Cluster endpoint address and not the Reader endpoint address.
Since Amazon Aurora clusters are comprised of a writer node and multiple reader nodes, the Cluster endpoint volition always indicate to the author node in the cluster (even if 1 of the reader nodes has been prompted to a new writer, such equally after a failover) and the Reader endpoint volition load residual across all of the reader nodes in your cluster. Connecting to the reader endpoint volition non allow yous to write changes to your Aurora MySQL cluster.
![Screen%20Shot%202018-05-16%20at%207.18.17%20PM.png]()
-
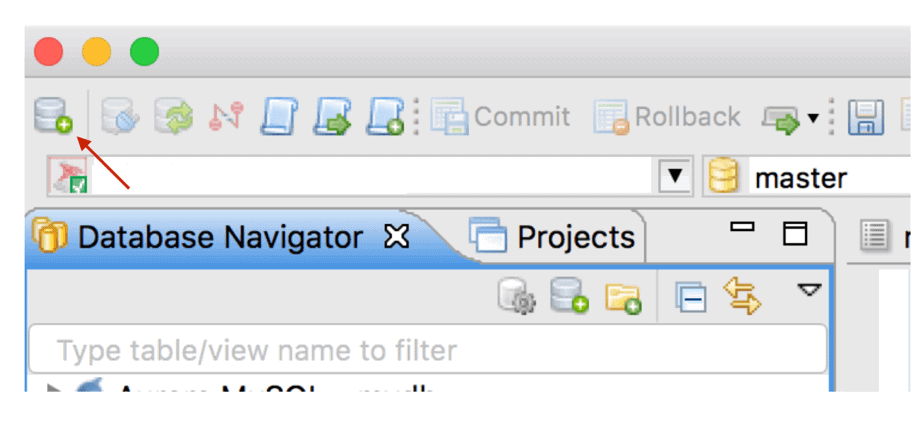
Y'all will now demand to connect to your Aurora MySQL cluster and invoke the Lambda functions you have created earlier. There are multiple tools bachelor, but I usually prefer to utilize DBeaver, which is a costless universal SQL client with good MySQL support.
-
After y'all accept downloaded and installed DBeaver, yous will demand to create a new connection to your Aurora MySQL cluster. You tin reach that by clicking on the Create New Connectedness button. Note that the location of this may differ depending on your DBeaver screen layout.
![Screen%20Shot%202018-05-16%20at%207.33.26%20PM.png]()
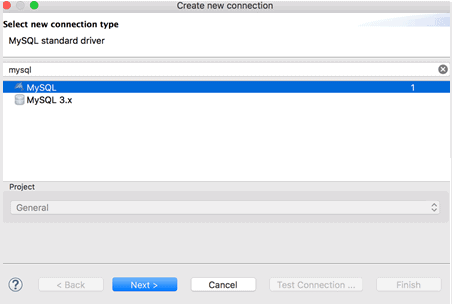
-
In the beginning screen of the Create new connectedness wizard, cull MySQL as the driver and click Side by side.
![]()
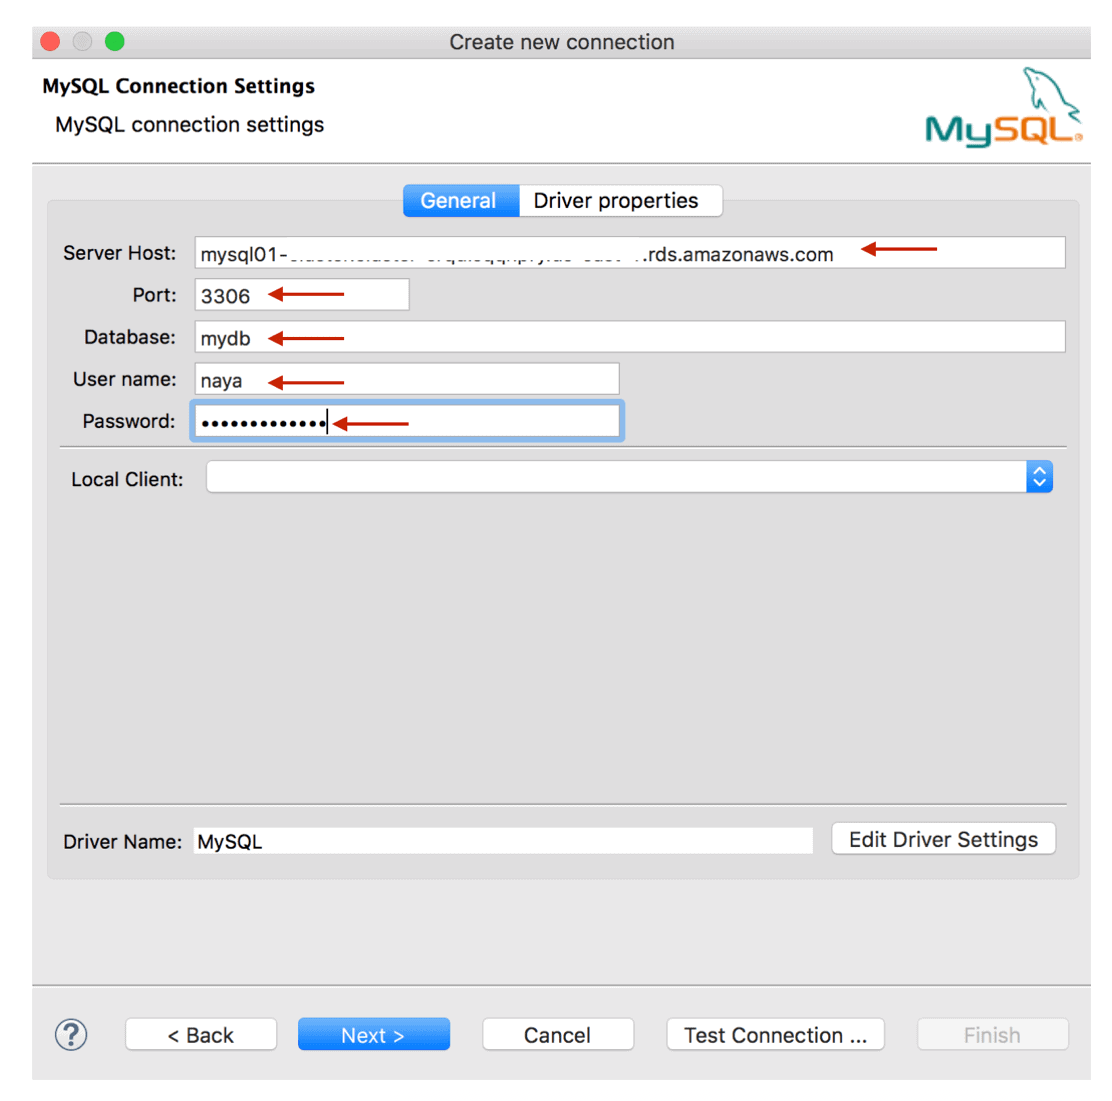
-
Next, yous will demand to provide the connection properties of your new Aurora MySQL cluster. This includes the Cluster endpoint you lot copied earlier for the Server Host, every bit well every bit the database name, username and countersign which you have configured during the cosmos of your Aurora cluster. In one case done click Examination Connexion and if the test was successful click Next.
![Screen%20Shot%202018-05-16%20at%207.27.45%20PM.png]()
-
Y'all tin can skip the next two screens past clicking on Next twice.
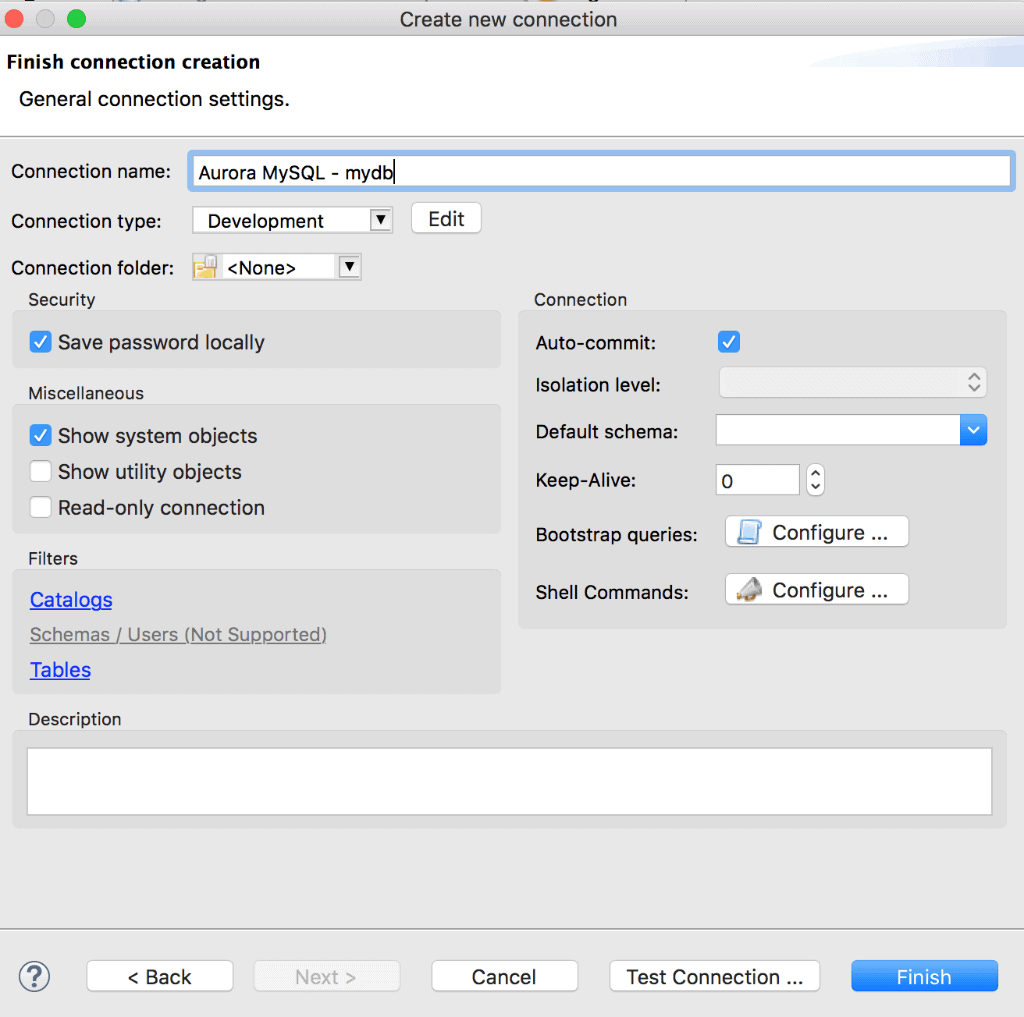
-
Consummate the cosmos of your new MySQL connection past providing a connection proper name and clicking on Terminate.
![Screen%20Shot%202018-05-16%20at%207.31.10%20PM.png]()
-
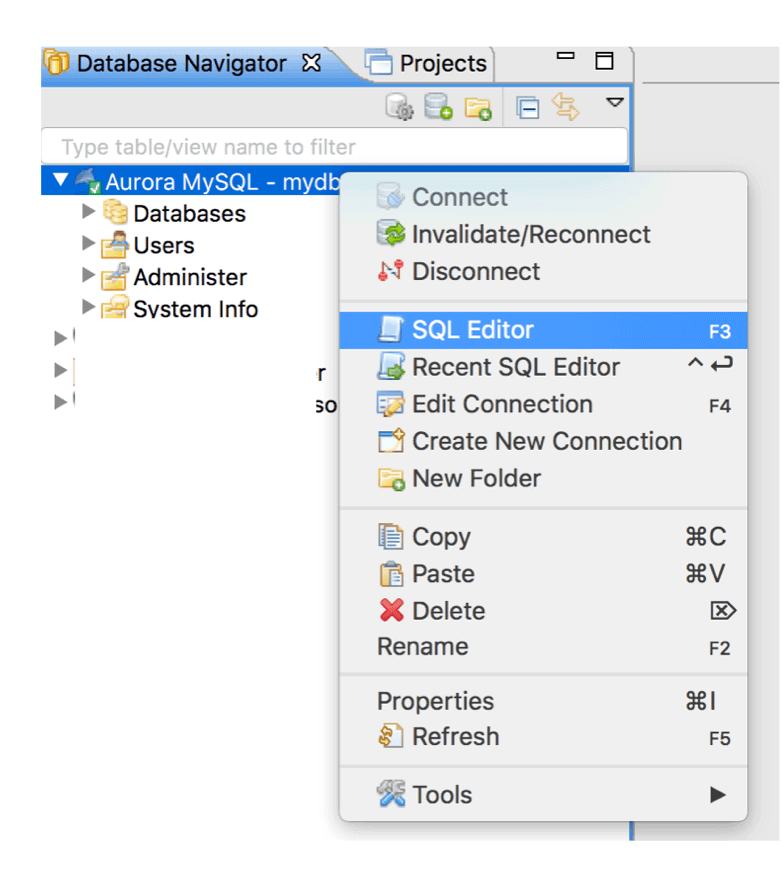
Right click on the new connection in the left-paw pane and open a new SQL Editor window.
![Screen%20Shot%202018-05-16%20at%207.36.40%20PM.png]()
-
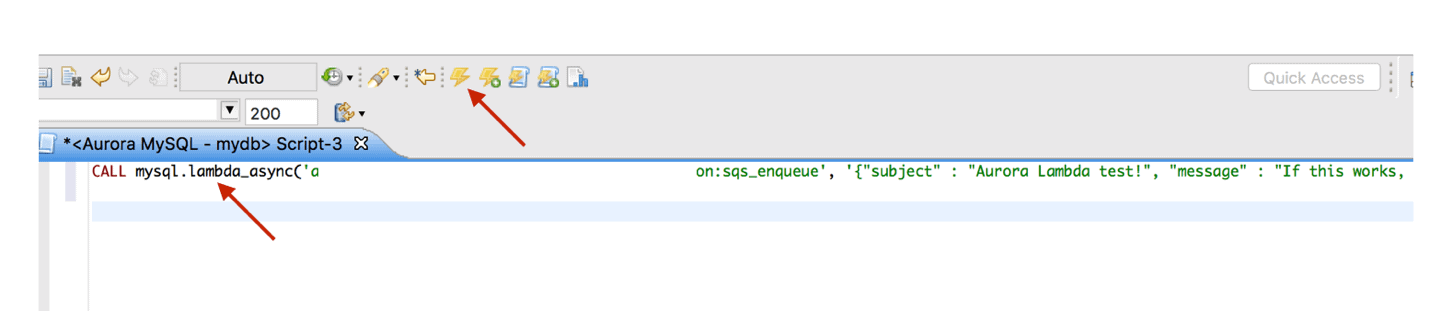
You can invoke a Lambda office from within MySQL by using the mysql.lambda_asyc procedure. Specify the ARN for the Lambda function you have created earlier and provide the JSON Payload for the message which will be sent to the queue:
CALL mysql . lambda_async ( 'LAMBDA_FUNCTION_ARN' , '{"subject" : "Aurora Lambda test!", "message" : "If this works, I tin can write to SQS!"}' ) ;
You can execute the Lambda office telephone call by clicking the Execute button.
![Screen%20Shot%202018-05-16%20at%207.39.46%20PM.png]()
-
Notation that if you receive a "missing credential" mistake at this point, y'all take probably missed one of the steps in configuring your IAM Role or Cluster parameter group settings.
-
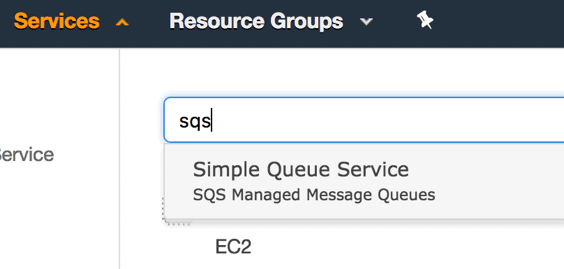
An piece of cake mode to verify that your messages take been sent successfully to the SQS queue through the usage of the Lambda part is to poll the SQS queue itself. Only navigate to the AWS SQS console.
![Screen%20Shot%202018-05-16%20at%207.42.12%20PM.png]()
-
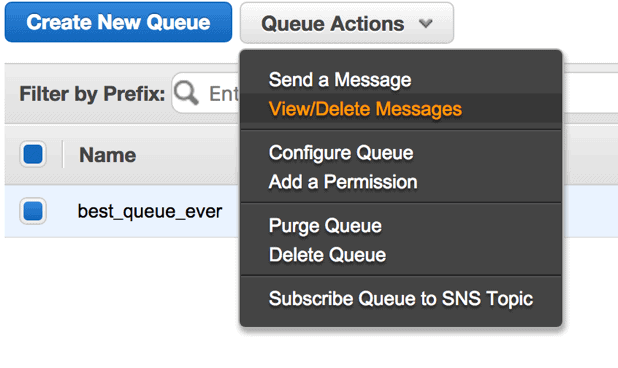
Select the queue which y'all take created earlier (best_queue_ever, in my environment), click on Queue Actions and choose View/Delete letters.
![Screen%20Shot%202018-05-16%20at%207.42.25%20PM.png]()
-
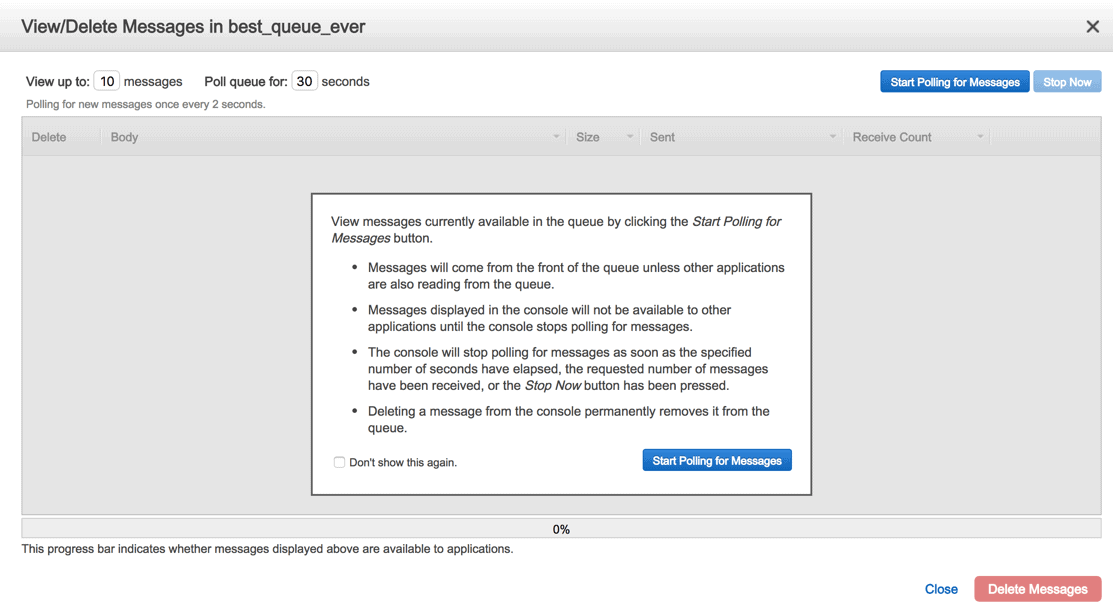
In the popular-up screen click on the Start Polling for Messages button in the center of the screen:
![Screen%20Shot%202018-05-16%20at%207.42.31%20PM.png]()
-
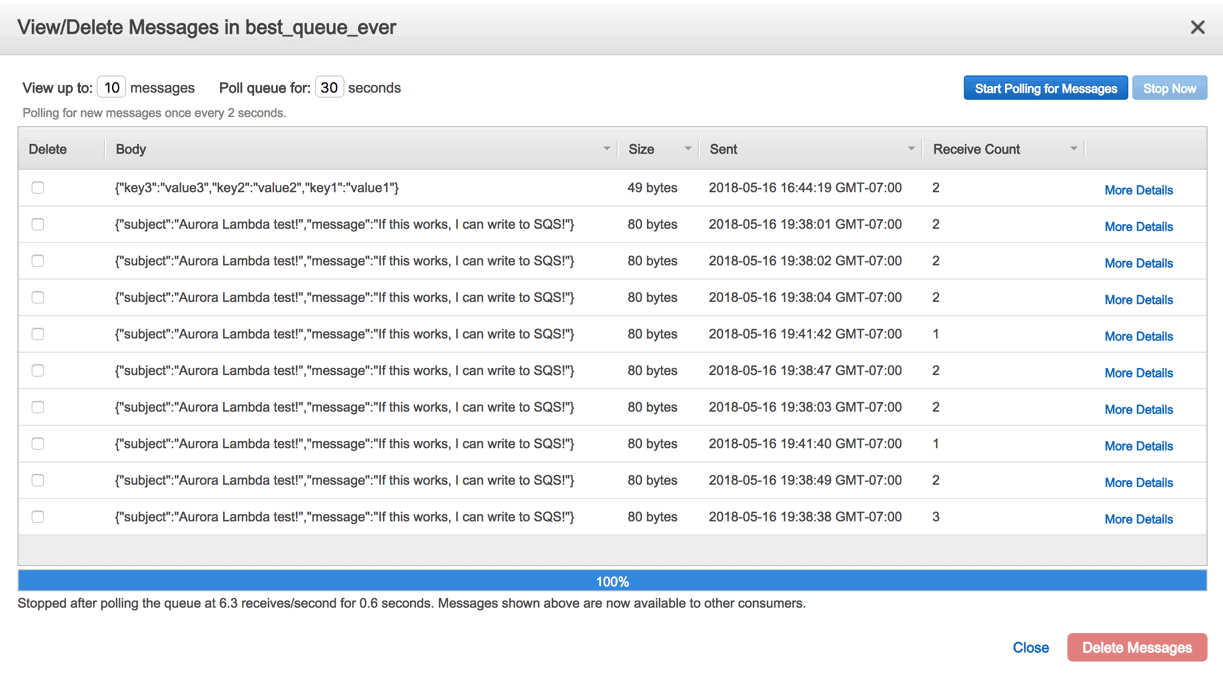
And if everything was successful up to this point, you should be able to run across your messages announced. This indicates that y'all have invoked a Lambda function which sent JSON payloads to an SQS queue from within an Aurora MySQL cluster .
![Screen%20Shot%202018-05-16%20at%207.45.24%20PM.png]()
-
Additionally, yous tin can also wrap mysql.lambda_asyc with your own custom procedure that can further heighten the business logic you want to execute equally well every bit perform error treatment. Plus, yous won't accept to specify the Lambda function ARN on each execution. You can find one such very simple case of embedding mysql.lambda_asyc within a stored procedure beneath:
DROP Process IF EXISTS sqs_enqueue ;
CREATE PROCEDURE < potent > sqs_enqueue < / strong > ( IN payload TEXT ) LANGUAGE SQL
BEGIN
Telephone call mysql . lambda_async ( 'LAMBDA_FUNCTION_ARN' , payload ) ;
END
; ;
call < strong > sqs_enqueue < / strong > ( '{"subject" : "Aurora Lambda test!", "message" : "If this works, I can write to SQS!"}' ) ;
Then there yous have it! Using a Lambda role from within an Amazon Aurora MySQL cluster to read and write messages to an AWS SQS queue. This is just 1 example of how yous can extend the core functionality of MySQL by leveraging boosted cloud-native components provided by AWS. To end up, you will probably desire to delete the instances.
Source: https://www.red-gate.com/simple-talk/cloud/aws/combining-amazon-aurora-lambda-and-sqs-to-go-beyond-the-native-capabilities-of-mysql/
0 Response to "Aws Lambda to Read Mysql Rds Endpoint"
Postar um comentário